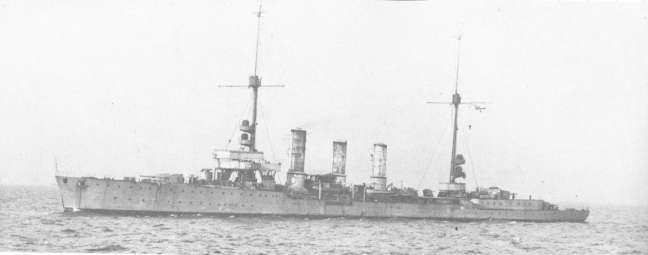
Submerged

  • Plymouth And Devon Shipwrecks
  • World Shipwrecks
  • Special Reports
  • Recommended Reading

The Kitchener Memorial, Orkney

High above the stormy sea on Marwick Head, five miles east of Dounby in Orkney, stands a lonely crenallated tower built by public subscription to honour the memory of Lord Kitchener who was lost in June 1916, when the cruiser H.M.S. Hampshire sank nearby. Off the 667 officers and men on board, only 12 survived.
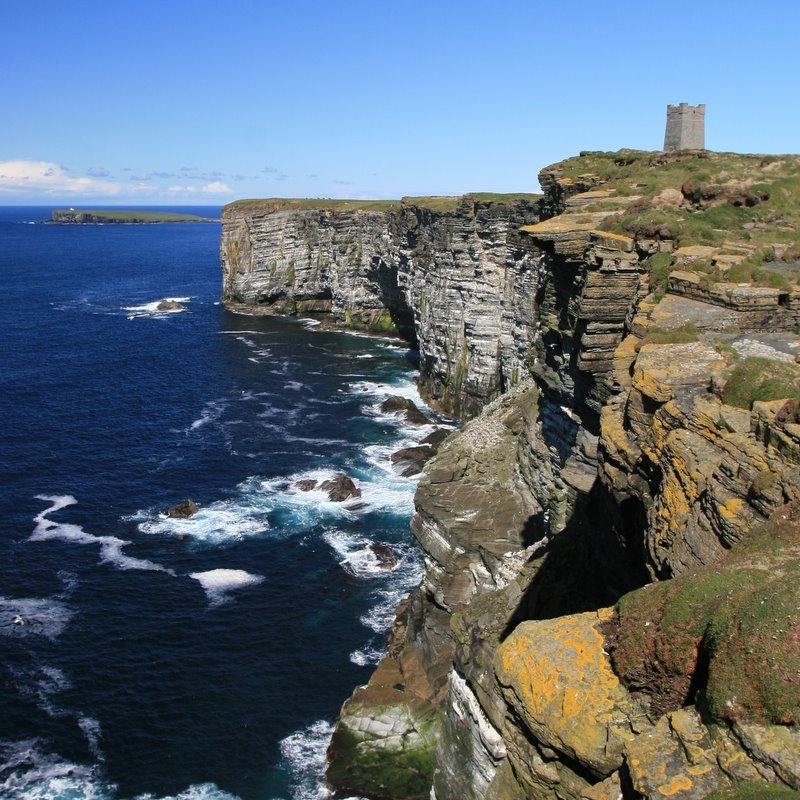
Marwick Head and the Memorial. Photo by John Findlay

Marwick Head and the Memorial. Photo by John Findlay

The official version of events stated that the Hampshire was taking Lord Kitchener to Russia to persuade the Tzar to keep his country in the war, when it struck a mine laid by the German submarine U75. Because Kitchener’s body was never found, rumours about his death and his mission to Russia abounded, reaching the same fever pitch as the ‘Who shot J.F.K.’ conspiracy. For instance, why were troops sent to stop locals rescuing the few survivors that were washed up on the shore? Had Kitchener been on board at all? And where was the gold bullion, supposedly being taken to Russia to bribe the Tzar if all else failed? Had the I.R.A. assassinated him? Kitchener had incurred their wrath by giving his approval to the bloody suppression of the Easter uprising of 1916, and the protracted series of executions that lasted through out May of that year.
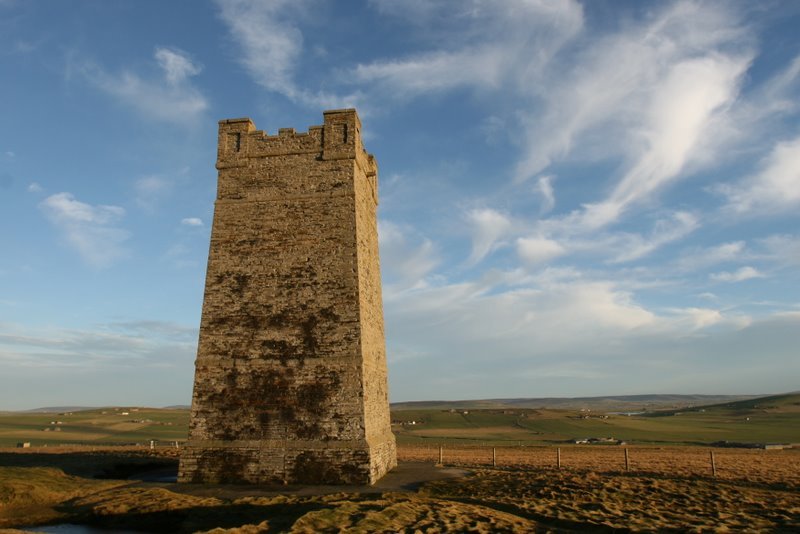
The Kitchener Memorial. Photo by John Findlay.

The Kitchener Memorial. Photo by John Findlay.

However the most persistent rumour was that a Fritz Joubert Duquesne, a Boer who hated the English for they had done to his Country, had disguised himself as the Russian Duke Boris Zakrevsky, and joined Kitchener in Scotland. He was suppossed to have signalled the German submarine, and got off H.M.S. Hampshire by using a life raft before it sank. He was apparently awarded the Iron Cross for his efforts. Interestingly the same Dunquesne ran a huge spy ring in the United States of America in the Second World War until he was caught by the F.B.I. in what became the biggest round up of spies in U.S. history. What is fact and what is fiction I will leave you to decide, and point you to this great site www.hmshampshire.co.uk that has lots more info and photos.
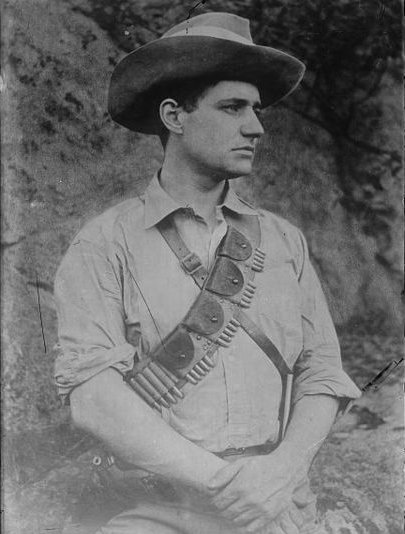
Fritz Joubert Duquesne

Fritz Joubert Duquesne

So who was Lord Kitchener, and why all the fuss? It is difficult to point to anyone in public life today and say that they are a National Hero, but that’s exactly what Kitchener was. Born in 1850 in Ireland, he came to prominence as an Aide de Camp in the failed mission to rescue General Gordon in the Sudan. He then achieved national recognition in his second tour in the Sudan (1886-1899) by defeating the army’s of Abdullah al-Taashi, the successor to the Mahdi, at the battle of Omdurman. The Mahdi had defeated and killed General Gordon, one of the great heroic figures of Victorian England, so after the battle, to avenge Gordon, Kitchener had the Mahdi’s remains exhumed, burned, and scattered in the river. For his efforts Queen Victoria appointed him Knight Commander of the Bath and made him Baron Kitchener of Khartoum.
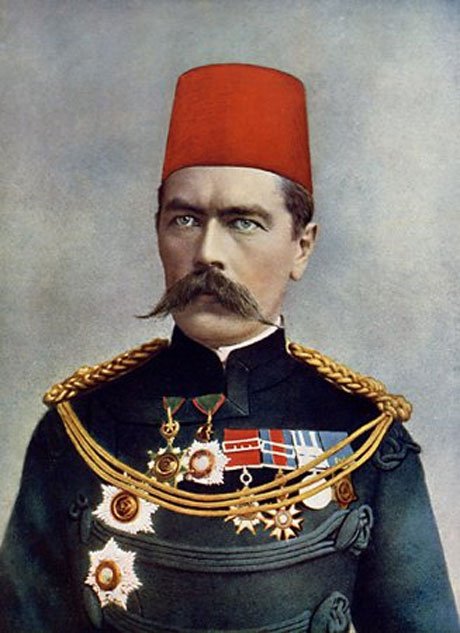
Kitchener of Khartoum

Kitchener of Khartoum

In December of 1899 Kitchener, now a Major General, was in South Africa for the start of the Second Boer War. In a brutal and savage conflict, Kitchener humbled the Boers by laying waste to their farms and driving their women and children into specific areas where they could be controlled. These areas became known as Concentration Camps. Conditions were dreadful, and in the end twenty six thousand women and children died of starvation. Kitchener had won, and they made him up to a full General, but his legacy of Concentration Camps, would later come back and haunt the world.

That Recruiting Poster.

That Recruiting Poster.

At the outbreak of the First World War, it was Field Marshall Lord Kitcheners face, on probably the most iconic poster in the world, saying Your Country Needs You, that incited thousands of eager young men to join up and fight the Germans. By now Kitchener was Secretary of State for War. Only with him at the helm, so the Country thought, could the Great War be won. So what about H.M.S.Hampshire and the secret mission to Russia?
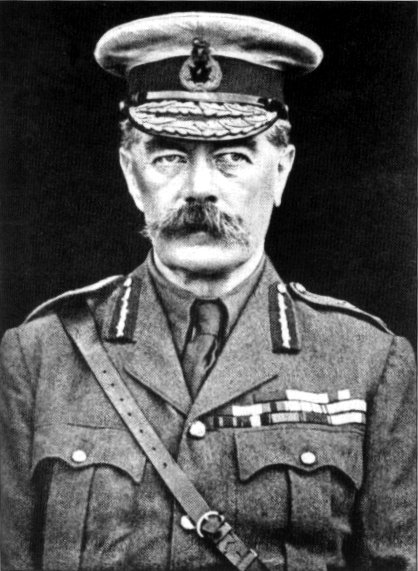
Field Marshall,Lord Kitchener.

Field Marshall,Lord Kitchener.

The armoured cruiser H.M.S.Hampshire was launched on the 24 September 1903 and was built by the firm of Armstrongs at Elswick. When she was completed in 1905 she joined the Channel Fleet and served in the Mediterranean and the China Station, returning to Scapa Flow, where on the 30 may 1916 she sailed as part of the Grand Fleet to fight at the Battle of Jutland. She returned safely on the 3 June to Scapa Flow, but was immediately ordered to embark Lord Kitchener and his staff, and proceed with all haste to the port of Archangel in North Russia. Here Lord Kitchener was to have urgent talks with the Tzar.
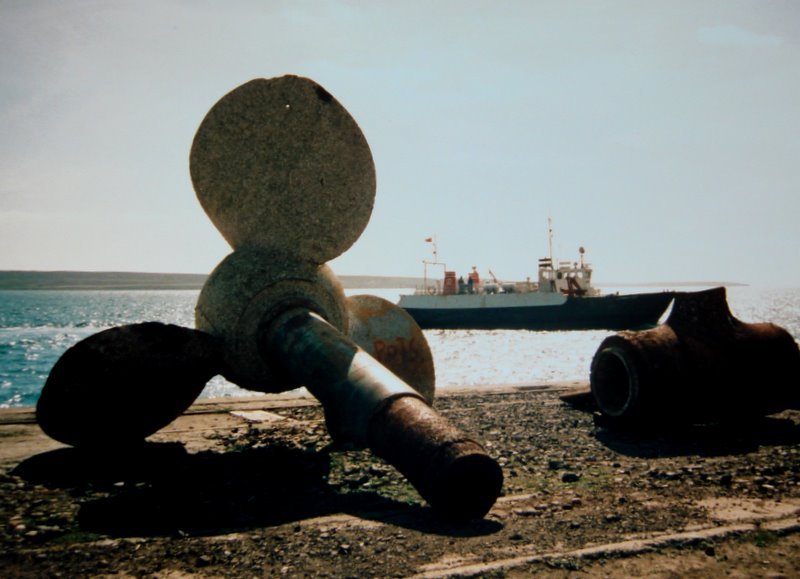
Prop Photo by John Findlay.

Prop Photo by John Findlay.
This 43 ton bronze prop was illegally salvaged in 1983, but later returned to Lynes after international protests,as H.M.S.Hampshire is a War Grave

The weather was appalling with gale force winds and mountainous seas, but the mission was deemed so important to Britain’s war effort that the Hamshire, under the command of Captain Savill, had to sail immediately. It was a bad decision and the ship did not get far. An hour after setting sail, Captain Savill decided to call it a day and return to the safety of Scapa Flow. However at twenty to eight in the evening, the Hampshire was racked by a huge explosion that ripped out the middle of the ship. She was about one and a half miles from the shore between the Brough of Birsay and Marwick Head, when she rolled over and quickly sank, taking most of her crew of 667 to the bottom.
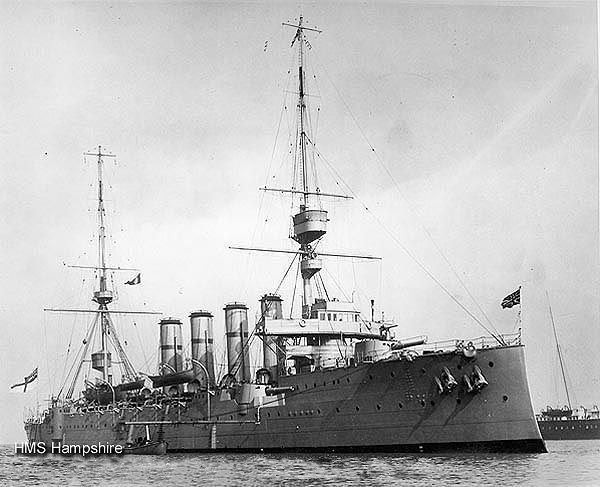
H.M.S.Hampshire.

H.M.S.Hampshire.

At the time it was thought that she had run into a string of twenty two mines laid by the German submarine U 75 commanded by Kapitanleutnant Curt Beitzen, who had been dispatched to watch the Grand Fleet as they left Scapa for the Battle of Jutland.
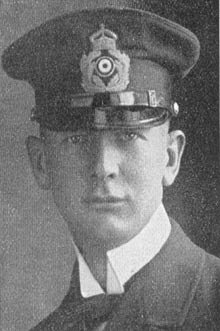
Curt Beitzen

Curt Beitzen

As the news reached Scapa Flow rescue ships were dispatched, but by the time they reached the area the Hampshire was gone, and only fourteen men in a Carly float reached the shore, two of them dying before they could be rescued. Over six hundred men were loss that terrible day. Many more would have been saved, but the life boats were smashed to pieces by the horrendous waves as they were lowered into the sea.
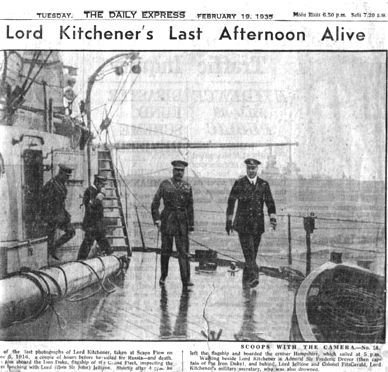
The last photograph.

The last photograph.

So what of Kitchener? Well many of the men who survived stated that Lord Kitchener was not killed by the explosion and must have made it to the upper deck, as they told to ‘make way for Lord Kitchener’. None of them saw him after that, and his body was never recovered.
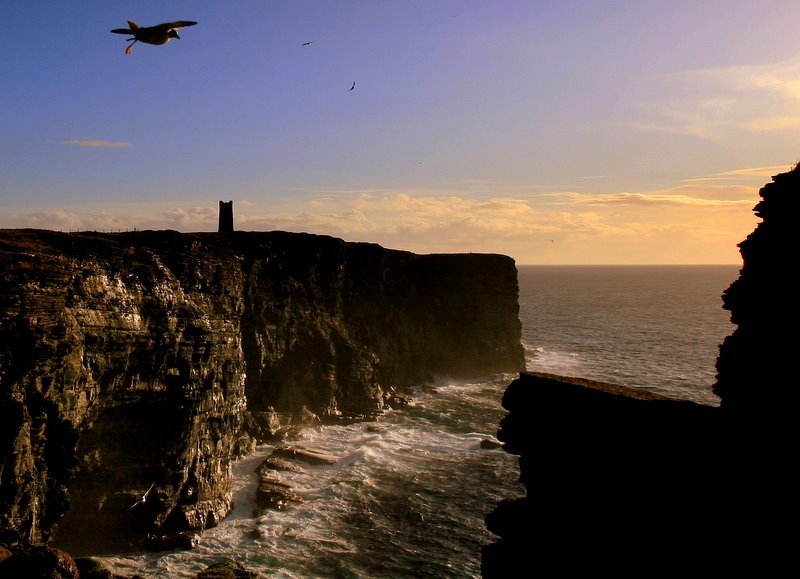
A great shot of the Tower. Photo by John Findlay.

A great shot of the Tower. Photo by John Findlay.

The money for the Kitchener Memorial was raised by the people of Orkney, and was dedicated in 1926. The inscription on the plaque says it all. This tower was raised by the people of Orkney in memory of Field Marshall Earl Kitchener of Khartoum on that corner of his country which he had served so faithfully nearest to the place where he died on duty. He and his staff perished along with the officers and nearly all the men of HMS Hampshire on 5th June, 1916. I am grateful to Brian Sandom for the following information and photos.
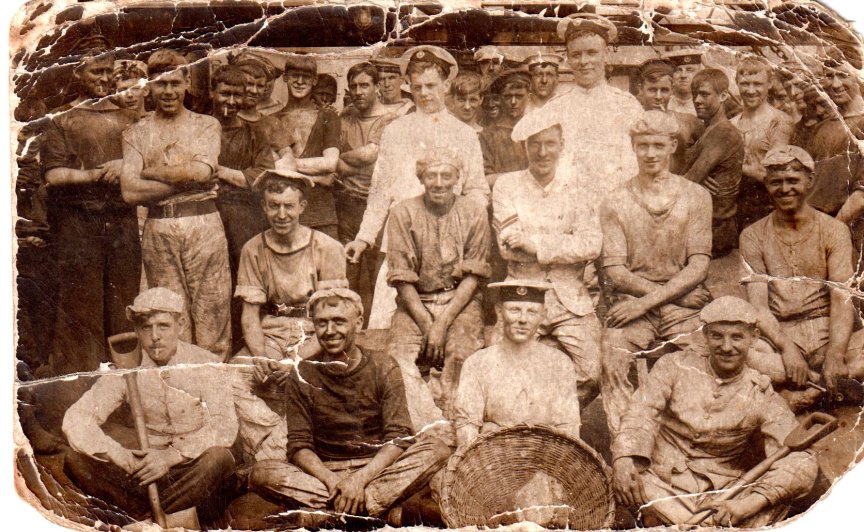
Crew

Crew

Some crew of the Hampshire, Gibert James Sandom is the very tall man in white wearing a Royal Marines hat.

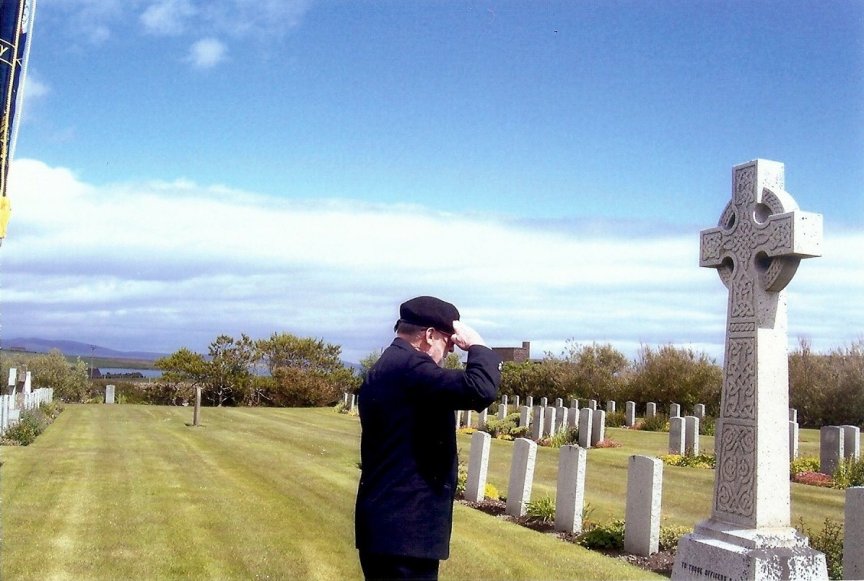
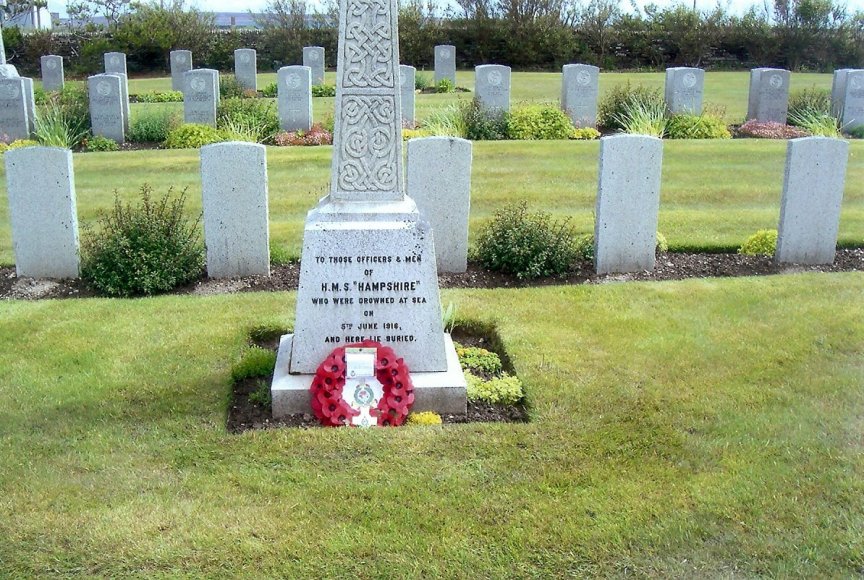
My Uncle Gilbert Sandom, a Royal Marine, was lost on Hampshire, and presumably lies with his ship. I have served 23 years with the Royal Navy. I plan to lay a wreath over the wreck on 5th June 2011, the 95th anniversary of the loss, and my 79th birthday As was expected the difficult task of actually getting to the wreck was not at this time possible, but on the 5th June we went to Marwick Head and crosses were laid at the Memorial to Lord Kitchener there. On Monday 6th my wreath was laid on the “Hampshire” memorial in the RN cemetery in Lyness.

Brian Sandom

Brian Sandom
Lyness Cemetery.

Lyness Cemetery.
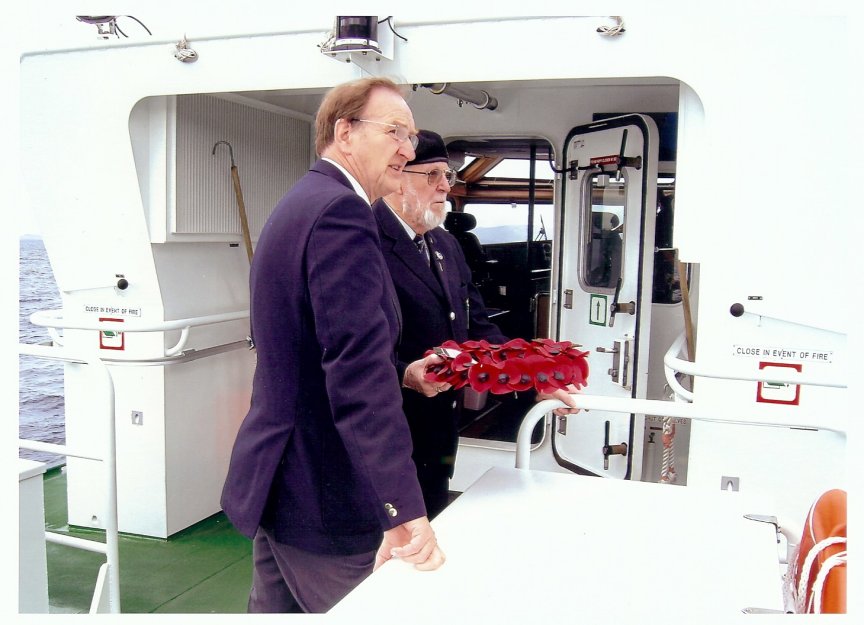
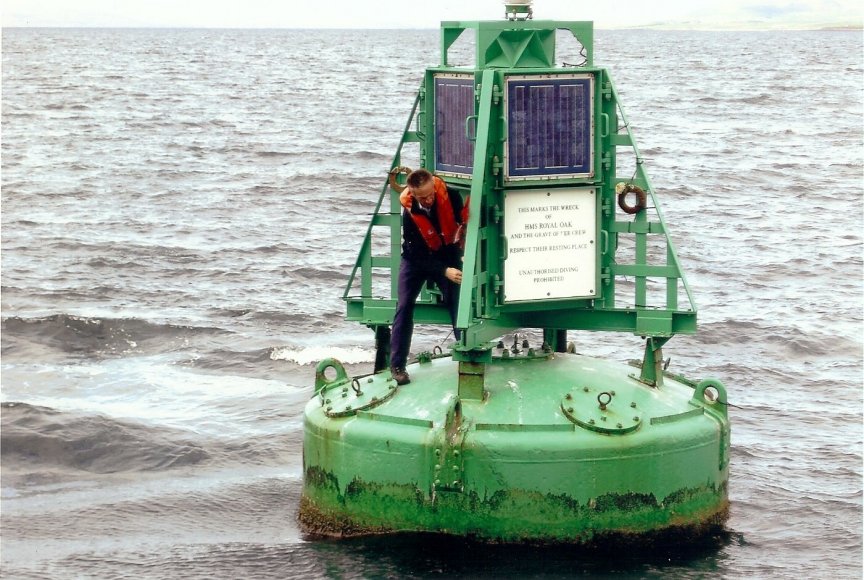
Brian with David Huges, Chairman of R.N.A. Orkney, laying a wreath on the Royal Oak.

Brian with David Huges, Chairman of R.N.A. Orkney, laying a wreath on the Royal Oak.

Brian with David Huges, Chairman of R.N.A. Orkney, laying a wreath on the Royal Oak.

I am grateful to Bill Holden for the following information and photos.

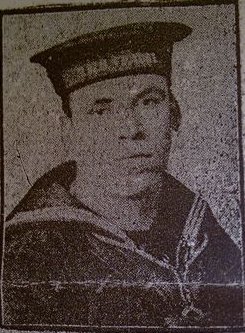
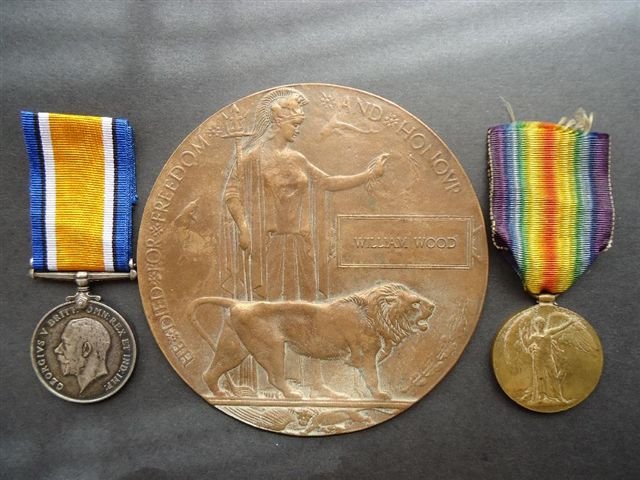
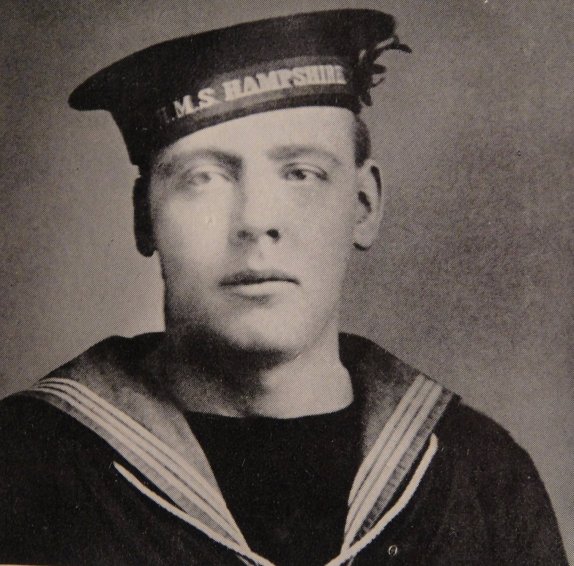
Stoker William Wood from Poolstock, Wiggan who died in the Hampshire tragedy.

Stoker William Wood from Poolstock, Wiggan who died in the Hampshire tragedy.
Stoker William Wood Medals.

Stoker William Wood Medals.
Stoker Walter Farnden, another casualy from the Hampshire.

Stoker Walter Farnden, another casualy from the Hampshire.

I am very grateful to Dave Cambell for providing the information and photos below.

Other relics.

Other relics.

My Dad had the nail and a recessed ,Brass Drawer Pull,that he and his brother obtained by climbing down some cliffs nearby. They rescued them from the jagged drawer front, and the nail from a piece of wood off the ship.He saw the explosion and said there were only 13 or so survivors.He and my Uncle had been in France or Belgium a few weeks before and I believe were on leave.They served with the 7th Seaforth Highlanders .He fought at the Somme,Ares,Mons Ypres and Zonnybeck among other places.He took two machine gun bullets in the stomach and somehow managed to survive.

Nail.

Nail.
The Reward for Earl Kitcheners Dispatch Cases is the original and just possibly the only one in existence. I can attest the nail is from HMS Hampshire,and the Reward notice from WmShearers Store in Stromness.

Reward.

Reward.

The Italian Chapel

A wonderfull panorama. Photo Peter Rowlands.

A wonderfull panorama. Photo Peter Rowlands.

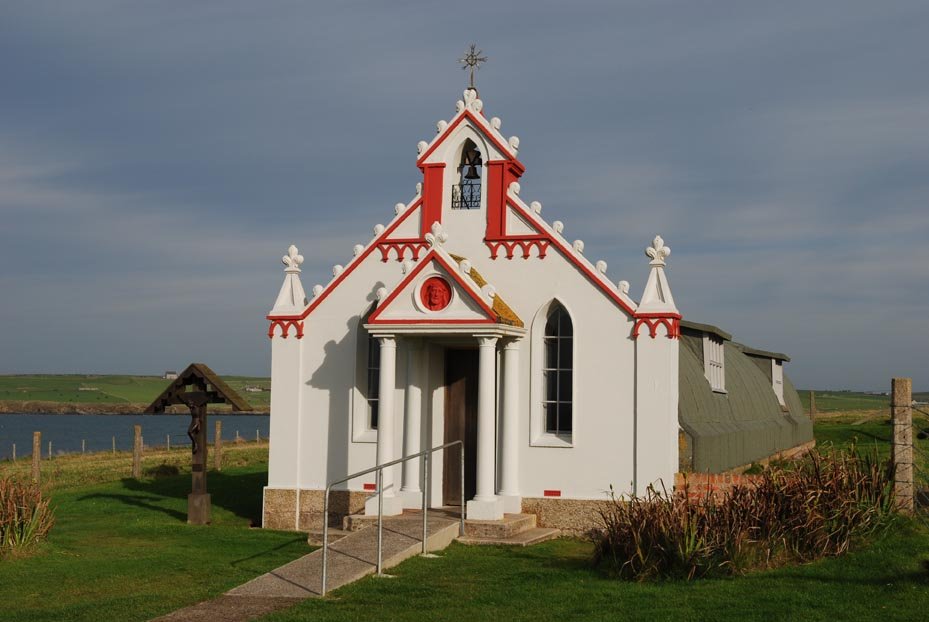
In the latter part of the Second World War hundreds of Italian prisoners were housed at Camp 60 on Lambholm, in Orkney. Most of these prisoners had been captured in the North African campaign and sent to Orkney to work on the Churchill Barriers, a series of huge concrete causeways which sealed the eastern approaches to Scapa Flow. Camp 60 consisted of thirteen basic Nissen huts which were pretty awful. However the Italians planted flowers, built concrete paths and soon the whole area looked a lot more like home. However there was one thing lacking for the Italian prisoners, and that was a chapel.

The Italian Chapel.Photo Peter Rowlands.

The Italian Chapel.Photo Peter Rowlands.

A fortunate combination of a new commandant, an enthusiastic priest, and a very talented artist prisoner called Domenico Chiocchetti soon got things moving, and in late 1943 two Nissen huts were made available to the prisoners to turn into a chapel. The result was both incredible, and inspirational.

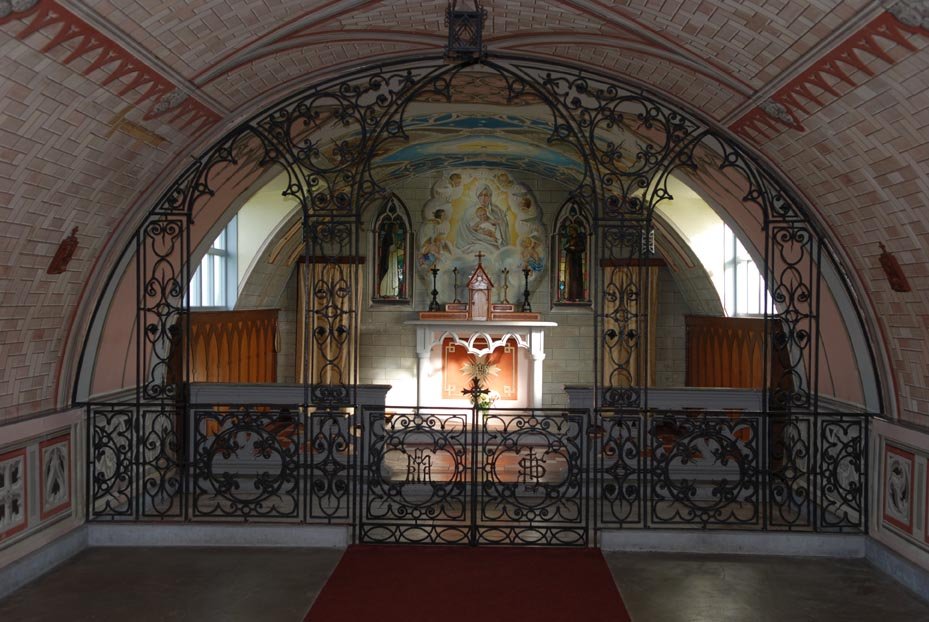
The inside of the Chapel showing the altar painting.Photo Peter Rowlands.

The inside of the Chapel showing the altar painting.Photo Peter Rowlands.

I first saw this chapel in 1986 and was immediately captivated by it. The inside of the huts have been plaster boarded and painted to resemble the inside of a church with a complete wrought iron sanctuary screen made out of pieces of scrap. The alter piece was Chiocchetti’s masterpiece. It was a painting of the Madonna and Child based on a famous Italian picture painted by Nicolo Barabina (1832-1891), a copy of which, Chiocchetti had carried around with him during the war.

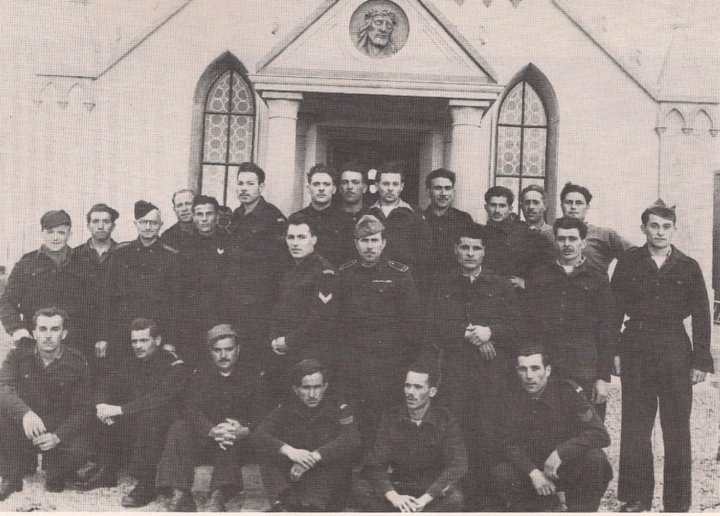
The men who built the Chapel. Chiocchetti is on the far right. Photo courtesy of the Chapel Preservation Society.

The men who built the Chapel. Chiocchetti is on the far right. Photo courtesy of the Chapel Preservation Society.

After diving on the German wrecks and wandering around Orkney looking at the remains of war, you soon realize (if you haven’t already) that war is such a tragic waste of human lives. This chapel brings it all into perspective. It’s a triumph of the human spirit and a huge affirmation hope. How those prisoners must have believed and prayed for a peaceful future.

The Geleitboot F2

Scapa Flow, the largest and most godforsaken of all the harbours ever used by the Royal Navy, is the scene of one of the most extraordinary naval episodes in history – the scuttling of an entire German High Seas battle fleet.

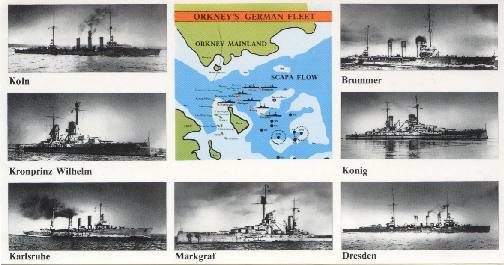
On 21 June 1919, eleven battleships, six battle cruisers, eight light cruisers and fifty destroyers slowly turned over and sank to the bottom of the sea. Although some were subsequently raised and others were partly salvaged, many more remain lying in the clear and rainlashed water that surges between the windswept islands making up the anchorage of Scapa Flow.

Scapa Flow Postcard.

Scapa Flow Postcard.

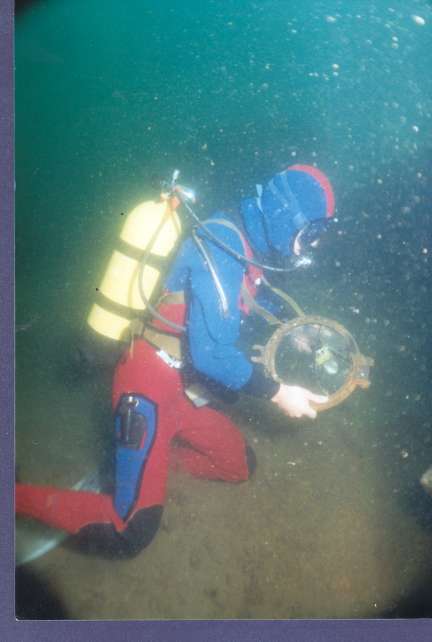
This is awesome diving, The sheer size of wonderships like the Konig and the Brummer are almost indescribable. And the fact that most are still intact right down to their portholes and guns leaves the wrecker almost speechless with delight.

Other wrecks are merely fantastic. Our boatful of divers voted the wreck of the F2 one of the most popular wrecks to dive. This was mainly because it was all so accessible and because people were not overawed by its scale.

Strangely enough, the F2 was not a victim of the events of 1919 at all. In fact, she was not even built until the start of the Second World War. And she was wrecked more by the carelessness on the part of the British than for any other reason.

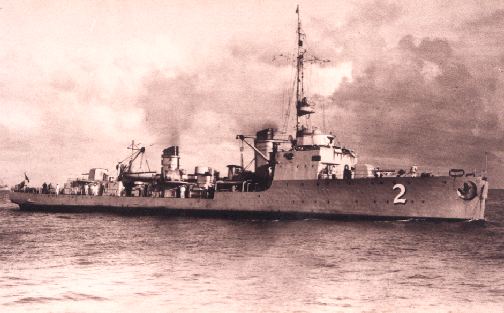
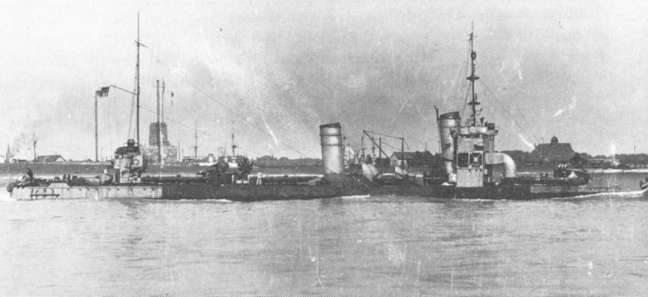
The Geleitboot F2.

The Geleitboot F2.

The F2 was built in 1935 by Germania as an escort vessel or Geleitboot of 756 tons. She was 249 feet long, twenty nine feet wide and had a very shallow draught of only just over eight feet. Unlike the Royal Navy, the Germans did not name all their ships, tending instead to christen only the biggest and the best. Lesser vessels like destroyers and escort vessels were designated instead by a letter and a number.

With two geared turbines, she could reach speeds of over twenty eight knots. For her crew of 124 this must have been purgatory. Although excellent sea boats, they were also incredibly wet and uncomfortable. They were not really designed to house a crew for long periods. Any heavy weather and the inside of the F2 would have been a real morale buster, even compared with the lower standards of their day.

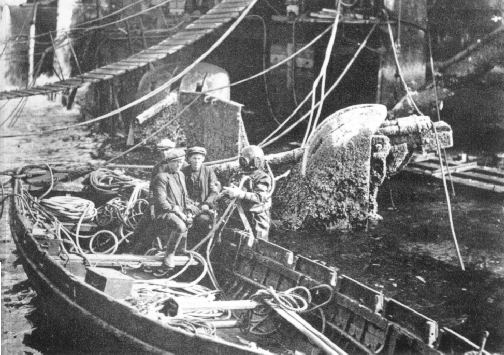
Hard Hat Divers at work.

Hard Hat Divers at work.

As well as being fast, the F2 also packed a sizeable punch. It had a 4.1 50 calibre gun mounted fore and aft, four 37mm machine guns and two one pounder guns for defence against aircraft attack. In addition, there wee also two sets of depth charge throwers for submarine attack.

If all that wasn’t enough, she could also be rigged for mine laying. All in all the F2 was a very useful and versatile ship, and it is not surprising that the Germans built scores of them. The F2 survived the war, and when the Germans surrendered, she was given to the British as part of their war reparations. The British took her to Scapa Flow in December 1946 to await further instructions as to her fate.

Inside the Gun Turret.

Inside the Gun Turret.

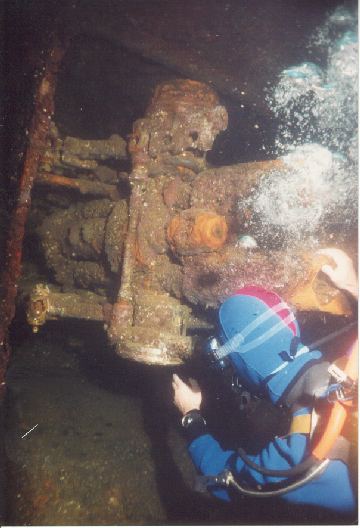
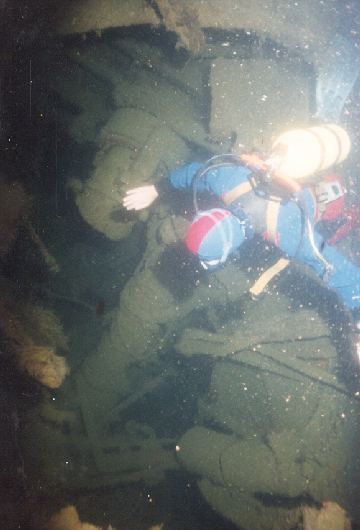
Quite what happened next is not clear. Suffice to say that she sank on 13 December 1946 in the channel between the islands of Hoy and Fara. She was not considered worthy of salvage. The F2 soon became a total loss. Most of the F2 today lies in just fifty feet of water. With the viz usually in excess of thirty feet, the sight of this wreck is staggering. The ship lies on her side, but the bows are completely intact with an entire 4.1 gun mounting still there. The gun seemed almost to be in working order, You can easily get right inside the gun mounting and look out through the gun slits, just as if you were part of the gun crew. Lying there on your side in the turret produces an optical illusion that makes the boat stand upright. There right in front of you are the bows flaring away, perfect in every detail.

Just back from the gun mounting are the remains of the bridge, which forms a huge overhanging cave as it sets onto the seabed. You can get inside, but it is a bit dark and a tight fit. If you poke your head underneath, you can avoid any potential embarrassment but still get the full flavour or what it would have been like.

Looking down into the tangle at the stern.

Looking down into the tangle at the stern.

Further back is the stern, all smashed up with iron plating everywhere. There’s masses of piping, broken stanchions, electrical cable and all manner of mangled bits and pieces. There should be another gun mounting, but I didn’t see one. This area is really interesting and if you have time, it is well worth a thorough examination, especially out on the sand just away from the wreck. There is plenty of broken pottery here, some with German markings.

Time starts to run out, but it is the bows and the guns that call you back for one last look. It really is a most magnificent sight.

As an encore, if the rest of your gang has not stirred up the sand too much, try this. Fin slowly towards the surface directly above the gun. When you get about ten feet from the surface, hold it and look back down. And remember the view – because there is nowhere else in the world where you can see anything quite like it. Fantastic!

Special Report: Scapa Flow:

  • Overview: Scapa Flow – the German Valhalla
  • Brummer
  • Geleitboot F2
  • Koln
  • Konig

Scapa Flow

Scapa Flow is the resting place of the entire World War One German High Seas fleet, which scuttled itself in the last moments of the war. This Special Report provides an overview of how the scuttling came about, and individual dive reports on some of the ships to be found at Scapa Flow.

I have not mentioned the Royal Oak as you cannot dive on her, but here is a small movie showing why she was sunk Extract from THE SILENT MENACE DVD

  • Overview: Scapa Flow – the German Valhalla
  • Brummer
  • Geleitboot F2
  • Koln
  • Konig
  • Dressden
  • Kronprinz Willhelm
  • V83
  • S54
  • U.B.116
  • Karlsruhe
  • Thames
  • The Kitchener Memorial, Orkney
  • The Italian Chapel

For further reading, try these. ‘Click’the book to find out more.

V83 Destroyer

The V83 belonged to the V67 class of destroyers (told you it was confusing). She was 269 ft long, 27 ft in the beam, had a top speed of 34 knots and a complement of 85 officers and men. The V83 was launched on 10th June 1916 and scuttled with the rest of the fleet on June 21 1919. However she was beached before she completely sunk, and was finally broken up in 1928. Her armament includes three 3.45 in guns six anti aircraft guns and she also carried 24 mines.

This is the V67, a dead ringer for V83.

This is the V67, a dead ringer for V83.

I dived this wreck in 1985 and this is what I wrote in my notes.

Vis 25ft. depth 50 ft to 6 ft. the wreck has its stern intact, with rudder still affixed. On top of the stern is a gun with brass all over it, and that is just the start. This wreck is very smashed up and points uphill towards the shore. It lays on a sandy bottom, but as it goes closer to the shore the kelp starts to take over. However all around lays the wreck with masses of brass and lead. Brass fittings are everywhere and most are very difficult to remove, but that didn’t really matter as there were lots just lying around waiting to be picked up. Halfway along you come up against another gun. Fantastic. After that its just wreckage. Boilers, brass, davits, brass, lead, copper heat exchangers, wreckage, wreckage wreckage. This is a great wreck for mooching about on. There is so much to see and poke at, and if you get bored you can go back and have a look at the guns. The other bits of the wreck are quite large and provide lots of holes and overhangs to crawl around in. I really liked this one.

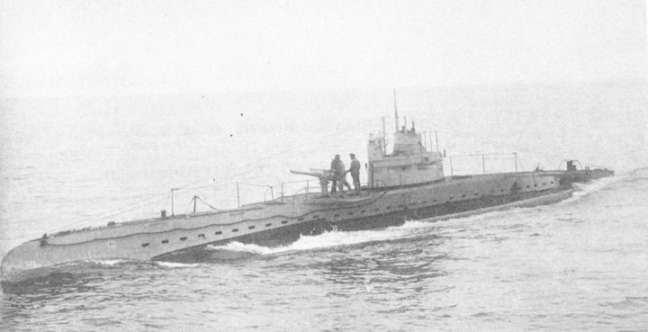
UB.116

Halfway through 1918 it was obvious to all that Germany had lost the War, and its Navy in particular, was almost fatally crippled with low morale and disaffection. An earlier attempt to confront the British Grand Fleet and bring them to battle had been frustrated, not by the Royal Navy, but by the German sailors themselves who mutinied and ran up the Red Flag. The U-boat arm however was largely unaffected in spite of its huge losses, and so in a last attempt to restore some pride to the German navy, an operation was conceived to place a lone submarine inside Scapa Flow the home of the Royal navy’s grand Fleet.

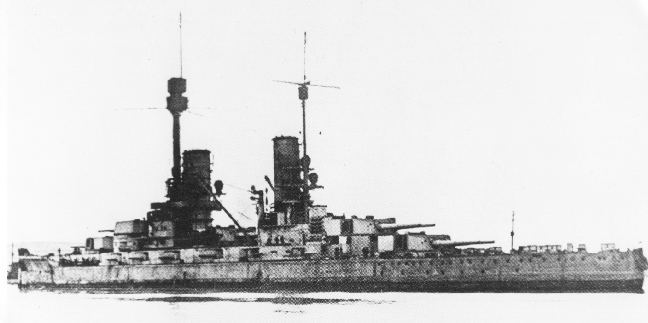
This is UB40 seen in 1916 and is the same class as UB116.

This is UB40 seen in 1916 and is the same class as UB116.

Its mission was to penetrate the Flows complex defences and sink as many ships as possible, regardless of any risks involved to the crew or the submarine. The idea was to put out of commission as many ships as possible before another planned outing of the German High Sea’s Fleet for a final Great Battle. The thinking of the High Command was, that even if Germany did not win this battle, the act of defiance would somehow burnish an almost otherwise fatally tarnished reputation and give them some much needed bargaining power when the German Nation had to finally admit defeat.
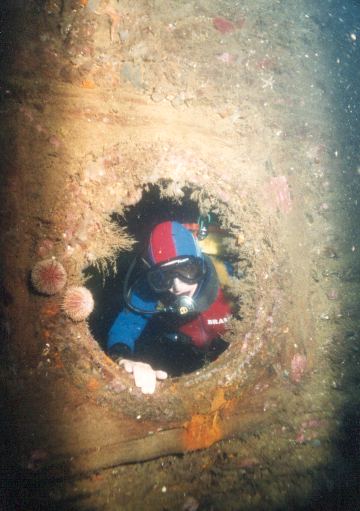
Unfortunately German Intelligence wasn’t very good at this point in the War, and they failed to realise that the Grand Fleet had largely been dispersed to other ports. Even if the plot succeeded in placing the sub inside the Flow there would be precious few ships to sink. On 25th October 1918, UB116, a 519 ton submarine armed with eleven torpedo’s left Heligoland for Scapa Flow. On board were four officers and thirty three ratings under the command of Lt. J.J.Emsmann. The Captain had been extensively briefed by the U-boat Staff who had advised him to penetrate the Flow through Hoxa Sound. This was because other U-boats passing through the Pentland Firth had reported that this entrance was in regular use by the Royal Navy and so was unlikely to be blocked by nets, mines or other obstructions.
The briefing was catastrophically wrong. Hoxa Sound was mined, the mines being controlled from the shore where they could be detonated electrically. Even worse, there were detector loops positioned on the seabed, which became active when an electric current was generated by the magnetic field of any vessel crossing them. Finally there were Hydrophones to pick up any engine noises of an approaching ship or submarine. On 28th October at 8.21 in the evening, the Hydrophones on Stanger Head, Flotta, picked up the first sounds of UB116’s engines. No friendly ships were expected, so the detector loops were switched on and everybody sat down to await developments.

Meanwhile Lt. Emsmann seemed to have convinced himself that all would be well if he just kept out of sight underwater. He was almost right. It wasn’t until 11.30 in the evening that he was finally sighted by a lookout when he came to periscope depth to confirm his position. To his delight he found that he was right where he wanted to be, inside the defences and near the Boom entrance. As he conned his submarine slowly towards the Boom entrance its magnetic field activated the mines, and on shore somebody pressed the detonate button. The UB116 was rent asunder killing all the crew instantly, and what was left swiftly sunk to the bottom leaving just a patch of oil on the surface at the mouth of Pan Hope.

A month later the War was over, and so UB116 was the last U-boat to be sunk in W.W.1, and incidentally the first to be sunk by a shore controlled minefield.

This was the first wreck I ever dived on at Scapa in1985, and these were the impression I wrote down.

This wreck lay in 95 ft with viz 25ft. The wreck is very broken up and scattered but our skipper put us on the main part where we could see the compressed air bottles. And part of the hull containing the engine area. Lots of lead and pipe around and some very nice brass worming gear. Right at the start I saw a conger eel poking out of off a steel pipe and then further along another quite large one with its head sticking out of a hole in the wreckage. I was only saying to the lads that I hardly ever see congers. There is a lot of brass lying around especially a thick brass pipe with a nice cap on it. To well fixed to get it off. The bottom consisted of sand, and lying around were various pieces of gear including a deck winch with the drum buried in the sand. Steel frames stuck out of the sand poking up into the water and the whole wreck was very picturesque. Its not a great wreck, but it’s a bloody good start.

Thames

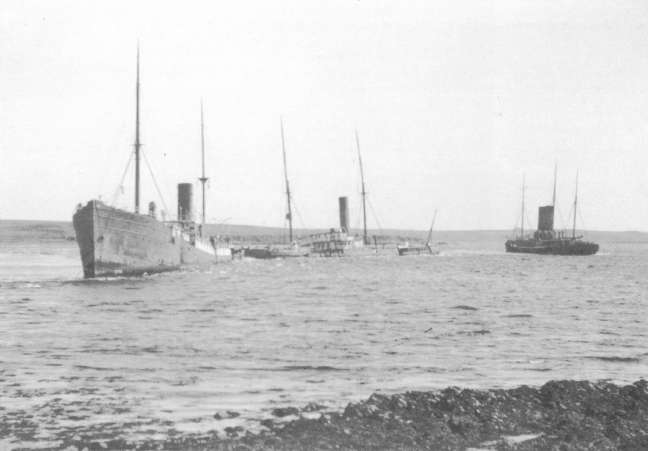
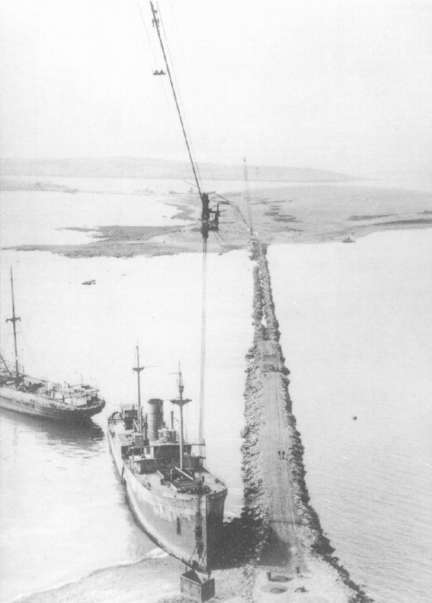
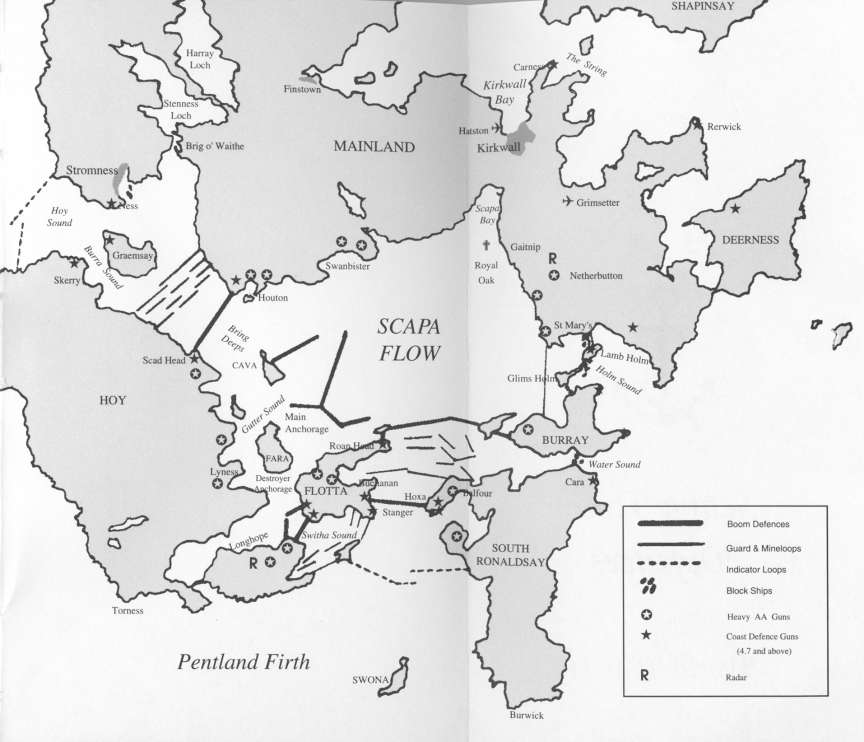
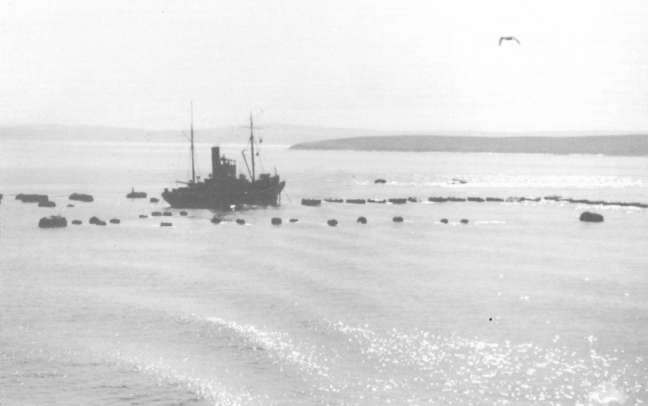
It was August 1914 before the Admiralty at last approved the defences for Scapa Flow. St Margaret’s Hope became a subsidiary base, which employed as many as two thousand men to do the work. The first submarine obstructions were little more than buoys moored across the Channels with herring nets strung between them. In November more robust steel nets and block ships were sunk across the eastern channels. These old merchant ships were brought up to the Flow without any ballast, and so were extremely light. It was very difficult to sink them in the right positions as the tides could run up to nine knots through Holm Sound. Eventually they were all successfully sunk correctly, and soon became part of the scenery until the more effective Churchill Barriers, with roads running across the top were built in the Second World War.

Block ships in Holm Sound. The Thames is on the right.

Block ships in Holm Sound. The Thames is on the right.

The block ships were particularly conspicuous in Holm Sound, especially the elegant shape of the former Royal Mail Steam Packet Company steamer Thames. She had once been commanded by Admiral Jellicoe’s father, and was a graceful three masted two funnel steamer, with a clipper bowsprit. When she was sunk, by the simple expedient of blowing her bottom out, she settled up right, and still gave the impression that she was still sailing on into Lamb Holm. Lying either side of her, to complete the blockage of the channel, were three other ships. The Numidian was a former Alland Line Trans Atlantic passenger ship, the Arangi came from the New Zealand line, and completely submerged was the Minieh.

Churchill Barrier under construction.

Churchill Barrier under construction.

After the First war the local fishermen kicked up about the inconvenience of not being able to use the Eastern Channels, and after a bit of argy bargy, the Admiralty said it would do something but then procrastinated and stonewalled for years, saying it was all too difficult. This was rightly seen as complete humbug buy the locals, as only a few miles away from these block ships, one of the greatest salvage operations in history was being carried out with salvaged German Battleships and Cruisers popping up all over the place. Eventually in 1929 the Admiralty gave the go ahead to remove the Thames and some other block ships, and so clear the navigable channel of Kirk Sound. They then handed over ownership of all the block ships to the County Council, and they in turn handed over the removal operation of the Thames to James Mitchell and Son of Dundee, on a no cure no pay basis. Bad move.

Scapa Flow Defences WW2.

Scapa Flow Defences WW2.

The Company was very confident, and work began in the summer of 1930 plugging all the holes in the hull. Unfortunately by the time the winter weather stopped proceedings, the Thames still wasn’t ready to lift. Work resumed in May 1931, but in July the Company announced that it would be abandoning the work. After nearly two years of toil it was considered impossible to re float the Thames, as her hull was ‘as thin as sixpence’. So there she stayed, gently rotting away, when suddenly she was back in the spotlight as one dark night in Gunter Prien in U47 committed one of the most daring raids of the U-boat war by creeping into Scapa Flow and torpedoing the Royal Oak with catastrophic results.

Anti submarine boom.

Anti submarine boom.

It turned out that the channel he came in by, which was supposed to be impassable to submarines, was in fact perfectly navigable, and that the Admiralty knew about it as long ago as 26 may 1939, nearly four months before War broke out. Once more the Admiralty wanted to save money, so they ignored the report sent in by the survey vessel H.M.S.Scott, which noted that the supposed blocked channel was in fact 400 ft wide, with a depth of over two fathoms at low tide. The ‘experts’ at the Admiralty considered a determined attack on the Flow as ‘unlikely’. After sinking the Royal Oak, Prien successfully negotiated the channel on the south side of Kirk Sound, passing close to the uninhabited island of Lamb Holm, almost scraping the barnacles of the Thames as he slid past to safety. In his log, Prien recorded the Thames’ two masts and funnels as a ‘schooner’.

That will do nicely.

That will do nicely.

At the end of the War steel was in short supply, so the thousands of tons lying in the shallows looked to be a useful resource. One by one all the block ships, including the Thames were stripped of any useful metal and steel plate, and their remains left to rust where they lay, and most are still there today.

I dived this wreck in 1985, and this is what I wrote in my notes.

Viz 15 ft at a depth of 50 ft. very silty. so a careless fin stirs it all up The Thames wreckage is jumbled up with what is left of the others, and seems to be lying on its side. Along one side is a whole row of portholes and as I drifted in through a hole in the hull, there almost covered by the mud was a loose porthole. Lots of other twisted plate and bits and pieces, but a porthole will do nicely.The rest of the wreckage is almost impossible to orientate on as its just a jumble of metal tossed by the scrappers into the shallows. if you dont stir it up though its very entertaining.

Overview: Scapa Flow – The German Valhalla

If you go just about as far north as you can go by car, and then take a two hour ferry ride, you will end up in the Orkney Islands. Beautiful and rugged, the islands cover an area of some 1200 square miles of wild ocean, encompassing some seventy tiny islands. The Ocandians make a living much as they always have, fishing the wild seas and farming the bare windswept land. Apart from its awesome beauty, (when the sun sets on a clear evening, you wonder if it is the start of the second coming) Orkney has little to commend it apart from the friendliness of its people and a particularly good malt whisky.

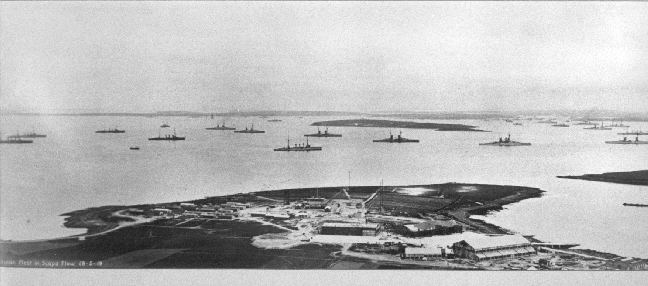
The German Fleet at Scapa Flow.

The German Fleet at Scapa Flow.

However there is one thing that makes these islands unique, and that is Scapa Flow, just about the best natural anchorage anywhere in the world. Hated by generations of sailors for its desolate location and mind numbing boredom, Scapa Flow, in its time, has housed some of the biggest battle fleets ever to be assembled anywhere on earth. It was from here that the British Fleet under Admiral Jellicoe sailed out to do battle at Jutland, and it was here that the horrendous tragedy of the Royal Oak took place, leaving eight hundred dead. Even so, all this would no doubt have passed forgotten into history if not for one of the most bizarre events in Naval history, the self destruction of the entire German High Seas Fleet. How could this have happened?

Today with our reliance on nuclear arms, and the consequent rundown of our conventional forces, it is almost impossible for most of us to imagine the sheer might of the Battle Fleets at the turn of the century. Today we consider the aircraft carrier Invincible to be a huge ship, but compared with something like the German Battleship Konig, she does not seem quite so impressive. Even her armament does not really compare for all its twentieth century sophistication. The Konig for instance had ten twelve inch guns in five twin turrets all on the centre line. This meant that they could all fire broadside. Each shell weighed over nine hundred pounds, so when the Konig roared, over nine thousand pounds of armour piecing high explosive hurtled through the air at over 2400 feet per second. Only God could help if you were on the receiving end.

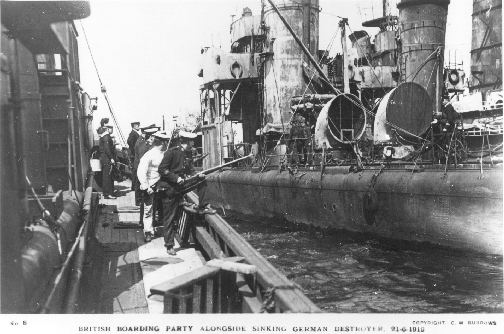
Boarding party.

Boarding party.

In their day the British and German Battle Fleets represented the ultimate in high technology, and were I suppose their equivalent of today’s nuclear arms race. Vast amounts were spent by both sides to build bigger and more powerful ships, and in this manner the seeds were sown that finally brought forth the terrible harvest of destruction in the Great War.

The German Navy under Tirpitz were convinced that if their fleet was powerful enough, Britain would accede to their ambitions in Europe rather than concede control of the high seas. Nothing could have been further from the truth. Britain with its huge Empire depended on the Navy, and over the years had kept a relatively small standing Army, relying on it’s awesome sea power to quash any stirrings abroad. The emergence of a powerful German Navy on its doorstep had a destabilizing effect and was bound to provoke mistrust between the two ‘super powers’. Soon the balance of power in Europe became irrevocably unbalanced. War was inevitable, and each countries Navy was determined not to be found wanting.

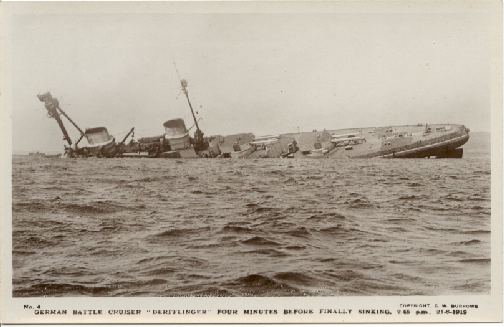
The Derflinger sinking.

The Derflinger sinking.


In the event the War at Sea was inconclusive. The two huge Battle Fleets met only once, at Jutland, and the outcome of that battle has been argued over ever since. Both sides claimed victory, and although the German Fleet sunk more ships and killed more sailors they failed to seize control of the North Sea. For the rest of the war they never again challenged the British Fleet to a full action, so strategically the Germans lost, and with their defeat went their best chances of winning the war.

On the 5 October 1918 with its Armies in mutiny on the Western Front, and the Navy barricaded by the British, the German Government offered an Armistice, and by the beginning of November hostilities ceased. The German High Seas Fleet based at Wilhelmhaven was due for dispersal to neutral ports to await the outcome of the peace talks. It soon became clear however, that the logistics of interning seventy four ships in different neutral ports would be virtually impossible, so the British insisted that the entire fleet should be interned at Scapa Flow. This was hardly a neutral port, and totally against the spirit of the agreement drawn up under the Armistice. The German Naval officers were not unnaturally furious. To them neutral internment meant that technically they were still in command of their ships pending the outcome of the peace talks. But internment by the British meant virtual surrender. They felt the dishonour very keenly. Here was arguably the worlds most powerful Battle Fleet, unbeaten in combat, finally being defeated by the betrayal of its own politicians.


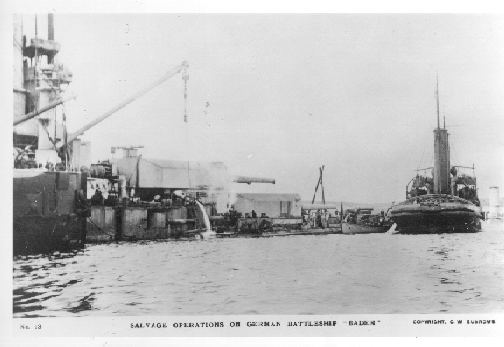
The battleship Baden being salvaged.

The battleship Baden being salvaged.

Meanwhile in Germany revolution was sweeping the country, and on board the High Seas Fleet morale, already at rock bottom, broke down into widespread mutiny, and the formation of so called ‘Soldiers Councils’. Officers found it almost impossible to keep any discipline, and it was only the faint hope that the Battle Fleet would be allowed home after the peace talks that held the Navy together. The man chosen to lead the mighty German Fleet into internment was Rear Admiral Ludwick von Reuter. At best it was a degrading job for any officer to take on, but Reuter, at the personal request of Admiral Hipper was determined to do it and somehow preserve the honour of the German Navy into the bargain.

On the 19 November 1918 Reuter led the High Seas Fleet out from Wilhelmshaven on their last journey, a rendezvous with the British Fleet at the Firth of Forth. Here, five Battlecruisers, eleven Battleships, eight Lightcruisers and six flotilla’s of fifty Torpedoboat-Destroyers were to be inspected to make sure they had completely disarmed in accordance with the terms of the Armistice. When satisfied the British Navy would lead this once proud German High Seas Fleet in groups to their final anchorage, Scapa Flow. As Reuter sadly wrote years later, ‘we were disarmed and dishonoured’.


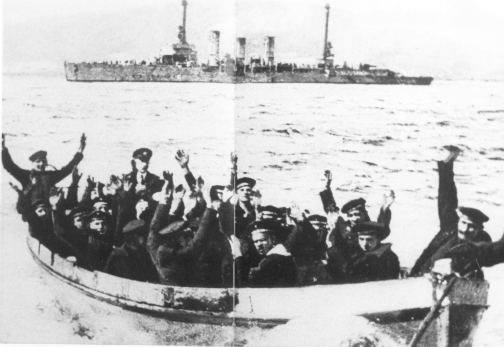
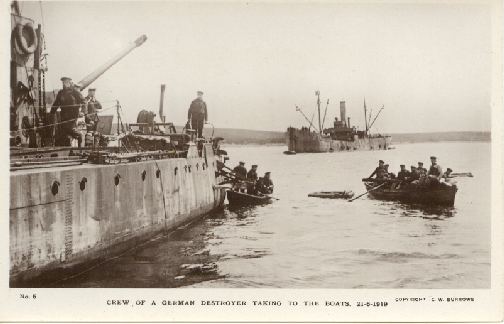
Sailors from the S.S. Nurenburg surrendering to the British.

Sailors from the S.S. Nurenburg surrendering to the British.

Reuter saw internment under the British as virtual surrender. With their love of legal niceties, the German Navy still saw the peace talks as a vehicle for their own salvation on equal terms, almost as if the war had not been lost but somehow brought to a draw. The British however considered the Germans to be the vanquished and treated them accordingly. In 1918 there was not much evidence of the British sense of fair play around Scapa Flow.

Scuttling was on everybody’s minds. For Reuter it seemed the only way of denying his ships to the Enemy if the peace talks went badly. The British had already circulated orders aimed at minimising the effects of scuttling, but knew in their heart of hearts that they could do little about it. (In the event all but twenty two of the ships completely sank, the rest were beached). Seven months were to go by until the Armistice came to an end, If the peace talks had not succeeded a state of war would once again break out. If this happened, Rear Admiral Reuter had decided that he would sink his entire fleet of seventy four ships rather than let the British have them.

Unfortunately for Reuter, the only information that he could get about the peace talks was what he was told by the British, or what he could read in four day old copies of the Times. This lack of up to date information had a bizarre consequence. By now it was almost certain that Reuter knew that his fleet would never get back to Germany, and therefore he would almost certainly have scuttled it, if only to preserve his notion of the German Navy’s honour. However it must be said that his actual decision to scuttle was based on a misleading report in a copy of the Times that was four days old.

At Versailles the peace talks were in chaos, and as the final date drew near, a close agreement still had not been reached. In the end the British, tired of the whole squalid mess, gave the German Government an ultimatum to either accept the peace terms by noon on the 21 June or face renewed hostilities. That is what Reuter read in his copy of the Times, and that is the information that he acted on. What he did not know is that later on the same day the Germans capitulated, accepted the terms, and the Armistice was extended by two days to tie up the loose ends.

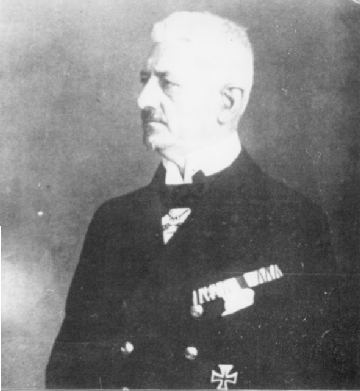
Rear Admiral Ludwick von Reuter, Commander of the German High Seas Fleet.

Rear Admiral Ludwick von Reuter, Commander of the German High Seas Fleet.

So when the 21 June 1919 dawned, there was Rear Admiral Ludwig von Reuter dressed in his best uniform pacing the deck of his flagship the Emden. At ten thirty he ordered the prearranged coded signal to be hoisted, Paragraph Eleven – Confirm. The controlled suicide of an entire fleet had begun. With their customary good timing the British had chosen this day of all days to withdraw the escorting Battleships and their attendant destroyers from Scapa Flow to send them on exercise. The only witnesses were a bunch of school children on a boat trip to view the ‘defeated Hun’. In a recent television programme some of those children, now grown old relived their memories. The passage of time had done nothing to diminish the clarity and vividness of their recollections. For them it had been the most incredible experience of their lives, and they could never forget it. If you are lucky enough to dive on the remains of this once mighty fleet, I can assure you that you too will always remember it. It is truly the German Valhalla.


Special Report: Scapa Flow:

  • Overview: Scapa Flow – the German Valhalla
  • Brummer
  • Geleitboot F2
  • Koln
  • Konig

Konig

Like a huge sea monster, the vast iron hull of the German battleship Konig suddenly appeared out of the gloom as we swam down the shot rope towards her. I knew that the Konig was going to be a large wreck, but even so I as completely unprepared for the sheer enormity of this vessel and for the way it seems to project its personality, lying there on its side like some stricken dinosaur from another age.

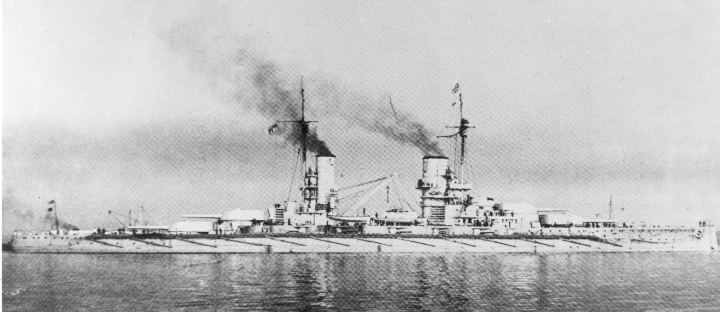
The battleship Konig.

The battleship Konig.

In its day however, the Konig was far from being a dinosaur and was in fact just about the last word in German naval technology. In the Imperial German Navy created by Grand Admiral Tirpitz in the early 1900’s, Germany had finally found a suitable symbol of her new and growing power. The navy was determined to build a fleet large enough to frighten off the British and the Konig represented the penultimate of the first generation German dreadnought battleships.

Built in the 1911 construction programme at Wilhelmshaven, the Konig was the ‘name’ ship of her class which included the Markgraff and the Derflingger. Displacing a massive 25,000 tons, the Konig was 573 feet on the waterline and nearly 97 feet wide. In places her armour plating was 14 inches thick and she had the ability to withstand huge amounts of shell and torpedo damage because of a sophisticated damage control system which enabled massive amounts of water to either flood complete compartments such as magazines, or totally drain compartments badly holed and taking in water. This damage control system was rigorously practised by the crews, who each year had to take part in a flooding exercise which actually included filling up a few compartments. The experience that this gave the crews paid off handsomely later on at the battle of Jutland.

One of the Konig's massive portholes.

One of the Konig’s massive portholes.

The Konig’s armament was awesome. Five armoured turrets, each containing two twelve inch guns could all be fired on the centreline, delivering a broadside that totalled over nine thousand pounds. As well as these five turrets there were fourteen 5.9 inch guns arranged down her sides, four 3.9 single anti aircraft guns, three torpedo tubes fitted at the bows and two at the stern each carrying up to ten torpedoes. It was no wonder that Rear Admiral Behneke chose the Konig to be his ‘flagship’ when he led his battlefleet to its historic confrontation with the Royal Navy at the battle of Jutland.

Alas for the Konig those heady days of glory lasted only a few short years. How the Battlefleets maneuvered and the politicians postured is now history. For the Konig and the rest of her kind, oblivion came on the 21st June 1919 when at Scapa Flow they pulled out the seacocks and deliberately sunk one of the mightiest battlefleets the world had ever seen. "Disgraceful" and "humiliating" have been some of the adjectives used to describe that memorable event. But if the scuttling was meant to save the German Navy’s honour, then it might be argued that they succeeded, for when you clap eyes on one of these gigantic ships you just cannot fail to admire them and wonder about the people who built and fought in them.

Another view of the Konig.

Another view of the Konig.

Nowadays the Konig lies in just over 100 feet of water, heeled right over on her side. On the day we dived on her the shot rope had bedded into the sand, and so what we were looking at was the bottom of the hull. In order to get to the main deck we had to swim fifty or sixty feet back up the hull until suddenly we reached the edge of a steel precipice. Looking down we could see the main deck plunging back into the murk, like the outside of a block of flats. As we carefully swam down, the first thing we saw was a huge gun turret, completely intact. As we swam around it, puffing air in our excitement, there, off to the left was another turret and what looked like another smaller gun. It was absolutely fantastic. There were these huge guns hanging sideways on a vast plain of metal, looking so real that at any moment you expected them to start swiveling.

One of the Konig's smaller guns.

One of the Konig’s smaller guns.

After the turrets we came across the after mast and one of the ‘fighting tops’ that were used to spot the fall of shot. These again were intact if a trifle full of iron rubbish. Still some voice pipes are still there, and there are lots of brass tallies and wheels with German labels and it is very easy to get in and out. Once away from the masts we found some smaller guns in open mountings, which looked like anti aircraft guns and seemed almost ready to fire with their brass calibration rings and breach blocks still dully shining in the clear water.

As we left the guns, we began to realise that the sheer size of this ship just has to be seen to be believed. In fact you really ‘feel’ it rather than see it, because the ship is so vast. With time and air rapidly diminishing we swam back along the top (actually the side) of the hull along lines of gaping portholes set in a gigantic iron plain that seemed to roll on forever. There is no question about it, the Konig is without doubt one of the greatest wrecks I have ever seen. She’s got size and she has got atmosphere and she has still got a lot of secrets. I only saw about a third of this ship and I hate to think what I might have missed. Still it gives me a good excuse to have another go and if you ever get up that way, I strongly recommend that you do too.

Koln – a German Light Cruiser

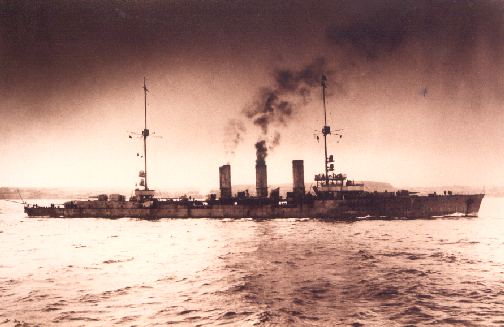
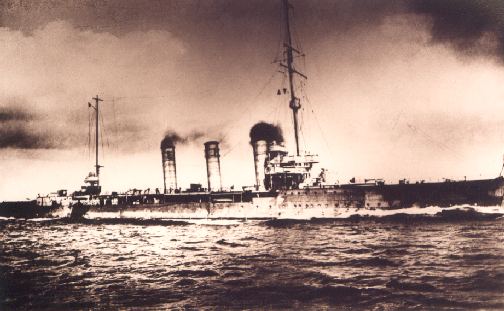
On the 21st November 1918 the German High Sea’s Fleet formally surrendered to the British Navy and were interned at Britain’s largest and bleakest anchorage, Scapa Flow. Amongst the fleet of captive ships was the light cruiser Koln which had only been completed about twelve months previously. One of the Karlsruhe class of cruisers, the Koln was officially classed by the German Navy as a small protected cruiser and to that end was equipped with eight 5.9 inch guns, two 50 calibre anti aircraft guns and four torpedo tubes, two underwater and two situated on deck just forward of the middle funnel.

The Light Cruiser Koln.

The Light Cruiser Koln.

The Koln was fast, easy to steer, but leaked like a sieve in any sort of rough weather. The crew’s quarters were appalling, cramped and badly ventilated with virtually nowhere to hang or dry clothing. The men slept on a ‘hot bunk’ system, the off watch members sleeping in the duty men’s beds. In fact crew accommodation was really an after thought, the main consideration was always weaponry and ammunition storage. It was quite common to have food stacked in the passage ways and cooking facilities were extremely rudimentary. The reason for these awful conditions was the difference in the attitude of the German Navy. Their ships were hardly ever at sea for extended periods, unlike the British who had, at the time, a huge worldwide fleet, so their ships did not have the necessary facilities. The German sailors did not mind too much because the lack of sea time gave them more time ashore, so they were reasonably content with the situation.

Peering into one of the holds.

Peering into one of the holds.

However once interned in Scapa Flow and forced to live aboard permanently, the Koln’s shortcoming became horribly apparent. Personal hygiene became almost non-existent due to the lack of enough water and the least said about the toilet facilities the better. Since their own food rations and spare equipment were soon used up, the German crews became dependant for absolutely everything on the British, who with their usual bureaucracy, fouled things up. There was never enough food or drinking water and of course no coal. Without coal there was no means of generating power and so the Koln became an inert lump of freezing, insanitary metal. Her crew, close to despair, grabbed at the one chance that would enable them to not only better their miserable conditions, but also embarrass and humiliate the British. The idea was quite simple and the German sailors seized their opportunity and scuttled the entire High Seas Fleet, including the light cruiser Koln.

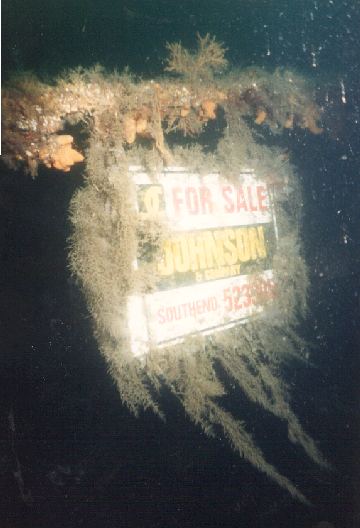
Nowadays the Koln, like so many of the other vessels, lies on her side in about 105 feet of water. The visibility at this depth is usually very good and as you fall down the anchor rope you soon see the huge bulk of this once proud ship emerge from the darkness. Although largely intact, the Koln has now started to break up. There are not as many guns on her as on some other wrecks, nor is there as much brass in evidence, but she is extremely picturesque. We landed on the forward part of the ship and swam at first over to the bows past the main anchor capstans and what looked like a gun mounting spindle. After poking around for a while, we then swam back to the bridge and saw the masts and rigging still intact, lying strung out across the sandy bottom. The crow’s nest was still in one piece and as we swam towards it, we saw attached to part of the rigging a large For Sale sign. It had not been there all that long, just long enough to gather some weed. I don’t know who put it there, but I bet the ‘old crew’ would have thought it very appropriate.

How Much ?

How Much ?

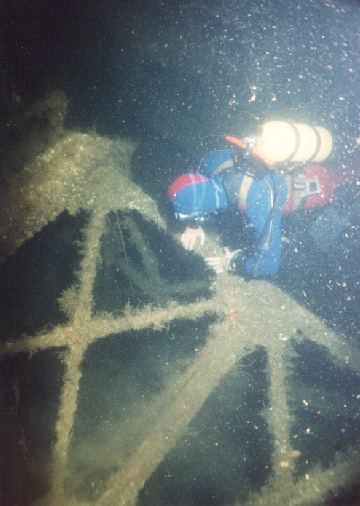
Further along was a large opening and peering inside we could see light coming in from the bottom of the ship some thirty feet below. As we swam down into this vast cavern, we could see, amidst the huge scrap yard of twisted metals, coils of lead covered wiring and a jumble of smashed up brass turbine blades. As we came out of the bottom hole onto the sand, we felt so pleased with ourselves that we just had to go and do it again. If only we had more time to explore the rest of the interior. Back up on deck we came to one of the more pretty parts of the wreck. One of the companionways stretching back aft from the bridge had become a jumble of broken railings and upright supports that had arranged themselves into a sort of iron tent, with lots of skylights. Pieces of seaweed clung to parts of the structure reflecting the sunlight onto the large anemones that proliferate on this wreck. The whole effect on a sunny day is quite spectacular and for a while it actually took my mind off looking for portholes. Talking of portholes, there are plenty of them about, but all the ones I saw were made of iron and they studded the outside of the huge hull like a rash of unsightly blisters. When viewed from the side, the vast iron walls, with their pockmarked craters, looked like something out of ‘Star Wars’.

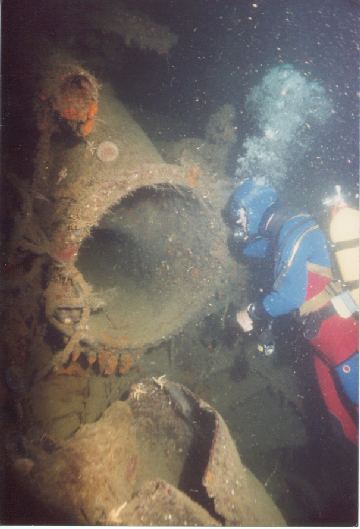
Looking into a mass of iron pipes.

Looking into a mass of iron pipes.

Back on the sandy bottom we found more holes to peer into and a great mass of iron pipes with large brass end fittings. All around us were the remains of smashed in bulkheads, with their supports rearing up fifty feet or so to the surface. With the surface light shining through making weird patterns on the sand, you feel that really it is just too much. The sheer bulk of these ships just has to be seen to be appreciated. The huge walls of steel with their gaping cavernous holes just lead you on and on from one visual experience to another and even if you are not a wreck fanatic, you cannot help getting caught up in the experience. The Koln is not the best wreck in Scapa, but it is manageable and when you finish your dive on her at least you will have seen most of her and be prepared for the massive battle cruisers that lie just a bit further along the anchorage.


Special Report: Scapa Flow:

  • Overview: Scapa Flow – the German Valhalla
  • Brummer
  • Geleitboot F2
  • Koln
  • Konig

The Brummer -A German Light Cruiser

Of all the wrecks that I dived on in Scapa Flow the Brummer remains my favourite. It certainly is not the biggest, but for sheer dive sensation I believe that it typifies what it is like to dive on these fantastic wrecks.

Built at Stettin and launched in December 1915, the Brummer was a light cruiser of some four and a half thousand tons. Its main armament consisted of four 5.9 inch guns and she had a top speed of twenty eight knots. At 14.30 on the 21 June 1919 she was scuttled along with the rest of the German fleet at Scapa Flow. Well that’s the bare facts. It certainly tells you about the boat, but it does not tell you anything about the almost heart stopping sensation that you get when you first dive on this relic of a once mighty Navy. Words like awesome, incredible and unbelievable are just some that were used by the other divers on our boat, and they did not even begin to get near the effect that this wreck had on all of us. And remember, this is only a light cruiser, not one of the mighty Battleships.

The Brummer.

The Brummer.

For once I am not going to try and give you a dive report because I do not think that it would do you any good. The distances to the wrecks are long and you really need local knowledge to sort out the tides and unpredictable weather patterns. Marks are not really much good either, the ring of islands all look so alike that most of us were permanently disorientated for most of our visit. When the weather worsens even the local skippers have some difficulties in finding the wrecks, but when they do they almost always put you on the more interesting bits (like the gun turrets). this sort of expertise is rather important because if you have never seen a light cruiser before, and left’s face it, not many of us have, you could find yourself swimming the wrong way along a steel wall reminiscent of a twelve storey block of flats.

These wrecks are just huge.

These wrecks are just huge.

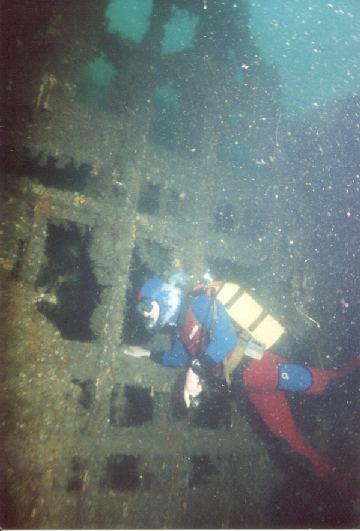
Today the Brummer lies on its side in one hundred feet of water. A ship this size, virtually intact and lying on its side takes some getting used to, and at first you tend to swim along with a crick in your neck. Fortunately however the visibility is excellent usually thirty foot or more, and once you see something like a gun turret it orientates you and then you can really start to enjoy your dive. As I said, thirty feet above the wreck, I saw a gun turret, and after examining that we swam into a mess deck. This was amazing. All the portholes, alas only Iron, were completely intact including the glass and deadlights. They were all just hanging open and as you swam along you just reached out and touched them and soon all the row of portholes were swinging to and fro.

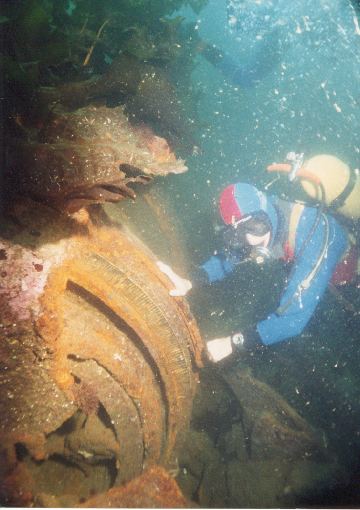
Brass Turbine.

Brass Turbine.

It seems a bit childish now, but we just swam up and down swinging on those portholes, shouting, (or trying to) to each other in our excitement. Looking down the width of the ship you could see the lattice of ironwork that supported the upper deck. At various intervals, hatch and doorways leading to other parts of the ship were visible and it was looking down a huge lift shaft. Light glowed in from a double row of portholes on the ship’s hull, lighting up the interior and giving a truly awesome impression of size. We plunged down the lift shaft burbling away to each other and came out of the messdeck through a hole in the side of the hull and found ourselves on another gun turret. The minutes were ticking by, but we just had to have a look at it and then we found that we were right beside the bridge, its empty square windows looking like black pits in a huge wall of steel.

Post Card.

Post Card.

As we swam back to the shot we missed it and came across the mainmast, complete with its fighting top and crows nest, lying stretched out across the sand. You could swim into the fighting top and still see some of the tally’s on the now rusting control gear. Absolutely incredible, I just did not want to come up. But, when I finally had to surface, I still could not shake off the feeling of sheer power that this ship conveyed to me. In her day the Brummer was an awesome example of German sea power. Sixty seven years on that word still describes her and the dive – awesome.


Special Report: Scapa Flow:

  • Overview: Scapa Flow – the German Valhalla
  • Brummer
  • Geleitboot F2
  • Koln
  • Konig

S54 Destroyer

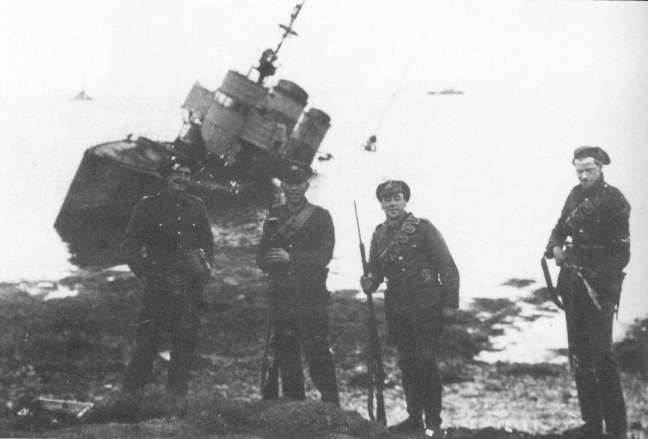
S54 was one of the S49 class of destroyers, and really very similar in size, speed and armament to the V83. She was launched on 11 October 1915 and when she tried to scuttle she was boarded, and they managed to beach her where she was finally broken up in 1921.

Probably not the S54, but you can see that this is how she was beached.

Probably not the S54, but you can see that this is how she was beached.

I dived this wreck in1985 and this is what I wrote in my notes.

This wreck lies in 50 ft and there is just scrap everywhere. Turbine blades, valve chests, you name it and its here. If you want to see brass on a wreck this is the place. The most noticeable are the engine turbine blades. You can’t miss them they just stick out of the main engine turbine. Trouble is they need a lot of work to remove, so its just as much fun looking. Besides that there is worming gear, valve chests, large pieces of sheet brass, lead and copper and then just loads more smashed up wreckage with more brass on it. Not only that it’s rather a pretty wreck as well, lying as it does on sand. It seems to be on various levels and you can rummage inside parts of the engine room, or just roam around the outside tripping over all that brass. It’s all well fixed. Still keep on banging.

Kronprinz Willhelm

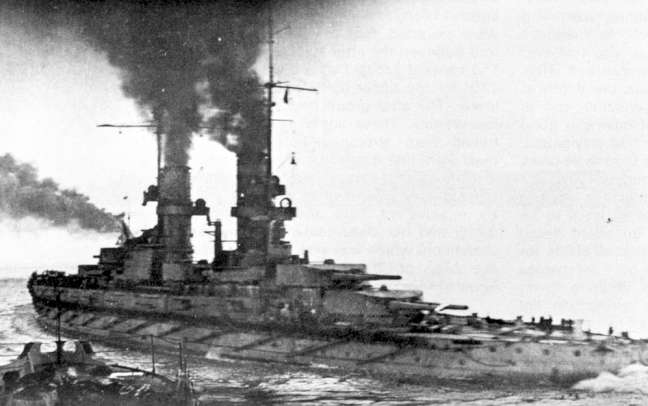
The Kronprinz Willhelm was one of four Konig class battleships and was 575 ft in length, nearly 97 ft in the beam, and had a draught of just over 30 ft. her top speed was around 24 knots, and when she was involved in the Battle of Jutland she had a complement of nearly 1300 officers and men. Ironically her turbines were powered by fifteen huge boilers made by a partnership of two firms, Schulz-Thornycroft, which just shows that the Arm’s industry never missed a trick, even back then.

The Kronprinz Willhelm seen here steaming into line.

The Kronprinz Willhelm seen here steaming into line.

Her Armament was fearsome, including five twin turrets of 12 inch guns which were all placed on the centre line with super firing pairs fore and aft with the fifth turret stuck in between the funnels but still at the same height as the aft super firing one. Either side of her massive hull was fourteen 5.9 inch guns arranged in Barbettes, with another six 3.45 inch guns and an array of anti aircraft batteries.

The ship was originally launched at Kiel on 21 of February 1914 as just the Kronprinz, but on 27 January 1918 she was renamed the Kronprinz Willhelm. (presumably in honour of Crown Prince William)

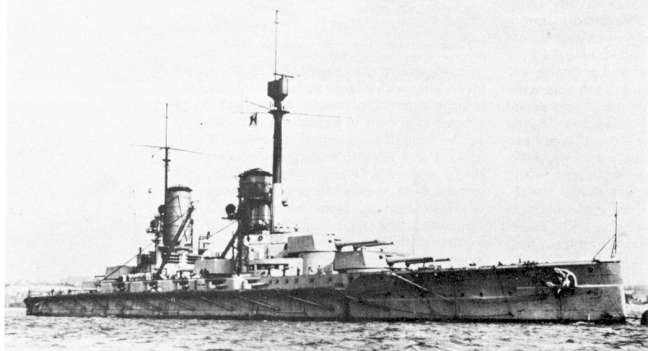
Kronprinz showing her thick foremast.

Kronprinz showing her thick foremast.

I dived this wreck in 1985 and these are the notes that I wrote then.

The wreck lies in 110 ft but most of it is accessible in 75 ft. A Battleship that is lying on its side. Such a shame that the Germans could not sink something upright. The shot was at the back of the hull so you had to fin up this huge wall of steel to the side and then suddenly its all downhill 110 ft to the bottom. It’s just like a block of flats. Again the scale is so immense that you just can’t quite get it. For instance we found two brass deadlights over two feet in diameter. God knows what the whole assemblage of porthole, glass and deadlight weighed. They were well fixed but even so were an amazing sight. After that we found that we were on the wrong part for the main turrets, but we saw a barrel of one of the side guns lying on the sand, the turret being recessed into the huge steel plating. Brass valves, big ones, were sticking out of the sand, and soon we came across a huge twisted amount of metal, then it was time to swim up to the side and along one of the four huge bilge keels. Very very impressive, but not really photographic because there is nothing to give any scale. It’s all so bloody huge.

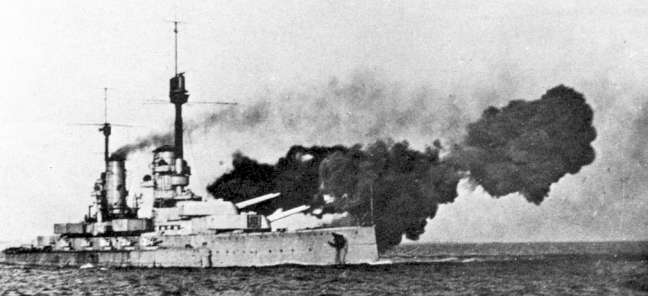
Kronprinz firing a broadside.

Kronprinz firing a broadside.

Karlruhe

The Karlsruhe was one of four Konigsberg (ii) class of Light cruisers, and should not be confused with the Karlsruhe Light Cruiser class of which there were two one being named the Karlsruhe. She was sunk on 4th November 1914. The Imperial German navy had a very confusing ship naming policy and it’s easy to research the wrong ship.

Anyway our Karlsruhe was laid down in 1915 and launched on 3rd January 1916.She had a complement of 475 officers and men and a top speed of 30 knots. This was provided by 2-shaft high-pressure navy turbines, powered by twelve boilers, ten coal and two oil fired. The Karlruhe was 478 ft long, nearly 47 ft in the beam and had a draught of 19 ft 8 inches. Her armament included eight 5.9-inch guns, three 3.45-inch guns, four batteries of 50mm anti aircraft guns, and she could also lay up to 120 mines.

I first dived this wreck in 1985 and this is what I wrote in my notes at the time.

The Karlsruhe lies in about 80 ft of water well broken up on a sandy bottom. Even so the first thing to hit you is the sheer size of the wreck. You just do not realise how big a light cruiser is until you see something like this with its huge ‘walls’ of steel. Access into the engine hold is easy, but they are vast caverns stuffed full of brass or lead. Easier are the huge gashes revealing a scrap yard of twisted metal and a jumble of bright brass turbine blades. Lead cable is coiled everywhere and seems quite commonplace after a while. One of the pretty bits was one of the companion ways with its upright supports and broken railings making a sort of iron tent, with bits of weed floating artistically around. Plumose anemones abound, but overshadowing all it is the sheer massive bulk of the wreck Huge iron portholes stud the iron walls and the whole thing viewed from the side looks like something from Star Wars. A really great dive.

In October 1997 I made another visit to the Kalsruhe, and still was not disappointed. This time the skipper put us right on the bow near the forward turret. After examining that (my first love) I swam along the deck looking into all the holes and hatchways, and sometimes going inside to see the great festoons of electric cable lying all over the place. At the bow the anchor windlasses are still there complete with anchor chain. The next really noticeable thing was the wooden decking and the Anemones. As always tons of brass, and far too much to look at in the time. It’s a very, very impressive wreck.

The Geleitboot F2

Scapa Flow, the largest and most godforsaken of all the harbours ever used by the Royal Navy, is the scene of one of the most extraordinary naval episodes in history – the scuttling of an entire German High Seas battle fleet.

On 21 June 1919, eleven battleships, six battle cruisers, eight light cruisers and fifty destroyers slowly turned over and sank to the bottom of the sea. Although some were subsequently raised and others were partly salvaged, many more remain lying in the clear and rainlashed water that surges between the windswept islands making up the anchorage of Scapa Flow.

Scapa Flow Postcard.

Scapa Flow Postcard.

This is awesome diving, The sheer size of wonderships like the Konig and the Brummer are almost indescribable. And the fact that most are still intact right down to their portholes and guns leaves the wrecker almost speechless with delight.

Other wrecks are merely fantastic. Our boatful of divers voted the wreck of the F2 one of the most popular wrecks to dive. This was mainly because it was all so accessible and because people were not overawed by its scale.

Strangely enough, the F2 was not a victim of the events of 1919 at all. In fact, she was not even built until the start of the Second World War. And she was wrecked more by the carelessness on the part of the British than for any other reason.

The Geleitboot F2.

The Geleitboot F2.

The F2 was built in 1935 by Germania as an escort vessel or Geleitboot of 756 tons. She was 249 feet long, twenty nine feet wide and had a very shallow draught of only just over eight feet. Unlike the Royal Navy, the Germans did not name all their ships, tending instead to christen only the biggest and the best. Lesser vessels like destroyers and escort vessels were designated instead by a letter and a number.

With two geared turbines, she could reach speeds of over twenty eight knots. For her crew of 124 this must have been purgatory. Although excellent sea boats, they were also incredibly wet and uncomfortable. They were not really designed to house a crew for long periods. Any heavy weather and the inside of the F2 would have been a real morale buster, even compared with the lower standards of their day.

Hard Hat Divers at work.

Hard Hat Divers at work.

As well as being fast, the F2 also packed a sizeable punch. It had a 4.1 50 calibre gun mounted fore and aft, four 37mm machine guns and two one pounder guns for defence against aircraft attack. In addition, there wee also two sets of depth charge throwers for submarine attack.

If all that wasn’t enough, she could also be rigged for mine laying. All in all the F2 was a very useful and versatile ship, and it is not surprising that the Germans built scores of them. The F2 survived the war, and when the Germans surrendered, she was given to the British as part of their war reparations. The British took her to Scapa Flow in December 1946 to await further instructions as to her fate.

Inside the Gun Turret.

Inside the Gun Turret.

Quite what happened next is not clear. Suffice to say that she sank on 13 December 1946 in the channel between the islands of Hoy and Fara. She was not considered worthy of salvage. The F2 soon became a total loss. Most of the F2 today lies in just fifty feet of water. With the viz usually in excess of thirty feet, the sight of this wreck is staggering. The ship lies on her side, but the bows are completely intact with an entire 4.1 gun mounting still there. The gun seemed almost to be in working order, You can easily get right inside the gun mounting and look out through the gun slits, just as if you were part of the gun crew. Lying there on your side in the turret produces an optical illusion that makes the boat stand upright. There right in front of you are the bows flaring away, perfect in every detail.

Just back from the gun mounting are the remains of the bridge, which forms a huge overhanging cave as it sets onto the seabed. You can get inside, but it is a bit dark and a tight fit. If you poke your head underneath, you can avoid any potential embarrassment but still get the full flavour or what it would have been like.

Looking down into the tangle at the stern.

Looking down into the tangle at the stern.

Further back is the stern, all smashed up with iron plating everywhere. There’s masses of piping, broken stanchions, electrical cable and all manner of mangled bits and pieces. There should be another gun mounting, but I didn’t see one. This area is really interesting and if you have time, it is well worth a thorough examination, especially out on the sand just away from the wreck. There is plenty of broken pottery here, some with German markings.

Time starts to run out, but it is the bows and the guns that call you back for one last look. It really is a most magnificent sight.

As an encore, if the rest of your gang has not stirred up the sand too much, try this. Fin slowly towards the surface directly above the gun. When you get about ten feet from the surface, hold it and look back down. And remember the view – because there is nowhere else in the world where you can see anything quite like it. Fantastic!

Special Report: Scapa Flow:

  • Overview: Scapa Flow – the German Valhalla
  • Brummer
  • Geleitboot F2
  • Koln
  • Konig

Dressden

The Dressden was one of the Coln class of Light Cruisers, laid down in Kiel in 1916 and launched on 24th Arpil 1917. This class was an improved version of the Konigsberg class, and were the start of an ambitious programme of ten vessels that were to be built to plug the gaps left by war losses. However due to material and manpower shortages, only seven were ever launched, and of those only two were actually completed and commissioned.

This is the Coln, same class as the Dressden, so a good look a like.

This is the Coln, same class as the Dressden, so a good look a like.

The Dressden, (not to be confused with the Dressden class of Light Cruisers of which there were two, the Dressden and the Emden of Von Spee fame. This Dressden was scuttled off Chile) was 510 ft overall, 46 ft 11 inches in the beam with a top speed of 27 knots. Her armarment was the same as the Karlesruhe.

I dived this wreck in Oct 1997 and this is what I wrote in my notes.

This is another huge wreck lying on its side in about 32 meters. There is loads of brass on this wreck and with the vis nearly 30 ft we went straight into the engine room and had a great root around. I then swam towards the forward gun and then down towards the stern where we found some huge thrust blocks. On the second dive we went from the gun towards the bow, inside the open bridge and then out onto the fighting top that was lying out across the bottom. We then swam on to the bow then back along the top of the wreck over the bilge keels. The hull was covered with plumose anemones. Again its hard to get a handle on a wreck this size, but what fun trying.

Submerged Books and DVDs

The Wreckers Guide To South West Devon Part 1
The Wrecker's Guide To South West Devon Part 1
The Wreckers Guide To South West Devon Part 2
The Wrecker's Guide To South West Devon Part 2
Plymouth Breakwater Book
The Plymouth Breakwater Book
The Plymouth Breakwater DVD
Shooting Magic DVD
Shooting Magic DVD
Devon Shipwrecks DVD
The Silent Menace DVD
The Tragedy Of The HMS Dasher DVD
The Tragedy Of the The HMS Dasher DVD
Missing  DVD
Missing: The Story Of The A7 Submarine DVD
HMS Royal Oak DVD
HMS Royal Oak DVD
Bombs And Bullets DVD
Bay Watch DVD
Bay Watch DVD

Search Submerged

Devon Shipwrecks

  • Blesk
  • Bolt Head To Bolt Tail
  • Cantabria
  • HMS Coronation and the Penlee Cannons
  • Deventure
  • Dimitrios
  • Elk
  • Empire Harry
  • HMS Foyle
  • Fylrix
  • Glen Strathallen
  • Halloween
  • Herzogin Cecillie
  • Hiogo
  • James Egan Layne
  • Jebba
  • Liberta
  • Louis Shied
  • Maine
  • Medoc
  • Nepaul
  • Oregon
  • Persier
  • Plymouth Breakwater
  • Poulmic
  • Prawle Point
  • Ramillies
  • Riversdale
  • Rosehill
  • Skaalla
  • Soudan
  • Sunderland
  • Flying Boats
  • Scylla
  • Totnes Castle
  • Vectis
  • Viking Princess
  • Yvonne

World Shipwrecks

  • Narvik
  • Scilly Isles
  • Scapa Flow
  • Truk Lagoon
  • Falmouth
  • Other World Wrecks
  • South Africa
  • Tombstones
  • Submarines
  • The Ones That Got Away
  • Bombs And Bullets
  • Marine Archeology
  • Wreck Walks

Shipwreck Book Reviews

  • Neutral Buoyancy – Tim Ecott
  • Admiral Shovell’s Treasure-R.Larn & R.McBride
  • The Silent Service – John Parker
  • Scapa Flow In War And Peace-W.S.Hewison
  • This Great Harbour-W.S.Hewison
  • The Duchess-Pamela Eriksson
  • Stokers Submarine-Fred &Liz Brencley
  • The Wreck at Sharpnose Point – J.Seale
  • Business in Great Waters – John Terraine
  • Submarine in Camera – Hall & Kemp
  • Autumn of the Uboats – Geoff Jones
  • Under the Red Sea – Hans Hass
  • To Unplumbed Depths – Hans Hass
  • Goldfinger – Keith Jessop
  • Custom of the Sea – Niel Hanson
  • Stalin’s Gold – Barry Penrose
  • Pieces of Eight – Kip Wagner
  • The Man Who Bought a Navy – Gerald Bowman
  • The Treasure Divers – Kendall McDonald
  • The Deepest Days – Robert Stenhuit
  • The Wreck Hunters – Kendal McDonald
  • Sea Diver – Marion Clayton Link
  • The Other Titanic – Simon Martin
  • Falco,chief diver of the Calypso – Falco & Diole
  • World without Sun – J.Y.Cousteau
  • Ship of Gold – Gary Kinder
  • Seven Miles Down – Piccard & Dietz
  • The Living Sea – J.Y.Cousteau
  • The Undersea Adventure – Philip Diole
  • Life and Death in a Coral Sea – J.Y.Cousteau
  • Dolphins – J.Y.Cousteau
  • Whale – J.Y.Cousteau
  • Shark – J.Y.Cousteau
  • Sea Lion- Elephant Seal and Walrus – J.Y.Cousteau
  • Octopus and Squid – J.Y.Cousteau
  • Shadow Divers – Robert Kurson
  • A Time to Die, the story of the Kursk – R. Moore
  • The Sea Around Us – Rachel Carson

© 1999–2025 Peter Mitchell and Chris Mitchell. All rights reserved.