On the 10 January I814the 645 ton wooden sailing ship Minnehaha had reached Falmouth with a cargo of Guano after a long voyage from Callao in Peru. On the following day she set off Ï…r Dublin, where she was due to discharge her cargo. Shortly after she left Falmouth the weather deteriorated and a severe north westerly gale started to blow. By the afternoon of Sunday 18 January Captain Jones thought he saw the light from the Wolf Rock lighthouse and ordered the helm to be put down. Shortly afterwards, the channel pilot, a Captain Yolk countermanded this order with out telling the Captain and almost immediately the Minnehaha rushed full tilt into the Jolly Rocks near the south east corner of Peninnis Head, ramming into the rocks with all sails set.

A huge hole was smashed into her port bow and within minutes she was underwater. Those who had not been swept straight away and drowned clambered into the rigging for safety. Captain Jones became quite unhinged, and undressing in the rigging he threw himself into the water shouting ‘with Gods help I will save your lives’. He was never seen alive again. Mr. Thomas the first mate, took a more practical aproach,and when dawn broke he led the remaining nine survivors down over the rigging, along the forestays and over the jib boom to safety on the rocks. The Minnehaha which was uninsured, soon became a complete loss, and pounded to pieces on the steep rocks around Peninnis head.
Dive report
This wreck now lies in roughly two places. The main body of the wreck lies right at the bottom of the Jolly Rocks in about 90 to 100 feet of water. Because of a previous dive we could not get down to this, so we had to content ourselves with the bits that were in about 50 feet. The bottom here is composed of huge boulders rising up the sheer face of the rocks. It was very rough on the day we dived and the surface water was very turbulent. One minute you were in 50 feet and the next you were being bounced around on top of the boulders in less than twenty feet. Although there is not a lot of wreckage to be seen, it is plain that a wreck is here. A few boom crutches and some anchor chain litter the bottom together with other pieces of broken metal. In amongst the boulders I found a wooden sheeve from a deadeye block, but with the poor vis, less than 15 feet and very mucky, it was difficult to have a good look. However there is obviously quite a lot to see, and with better conditions this site would be well worth another visit.


")
")
")
")
")


")
")
")

")
")
")


")

")


")
")


")
")
")


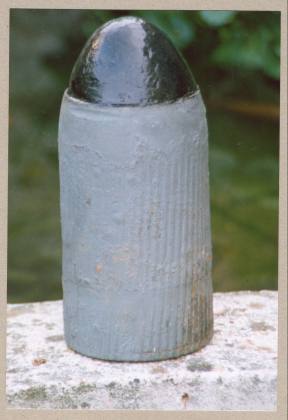
 aiming tube rounds. These solid lead shot are so common that my weight belt is made from them. It is less common to find a complete round with cartridge case still attached. Possibly ditched overboard as a miss fire. They were still in production well into the 1930's.")


 and 2 pdr.Pom Pom (bottom).")


